Showing posts with label Blogger. Show all posts
Lusus

How To Hide Share Buttons On A Blogger Homepage

In a recent post I mentioned how to add share buttons for Second Life related social networks to Blogger, and I also mentioned in passing that not all Blogger templates hide the standard share buttons on the homepage. If this is the case with your blog, then this quick tutorial will explain how to hide the share buttons on Blogger, so that they only appear on a blog post.

Before making any changes to a template it is strongly recommended that you download a backup. If you don't know how to do this, then the earlier post linked to above will explain how. Now just follow these steps:

1/ Sign into Blogger then select Template then Edit HTML.


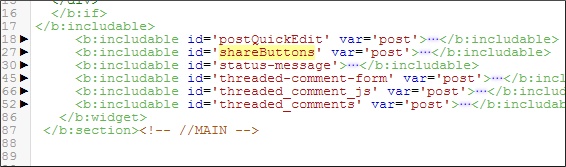
2/ click inside the template area, then hit Ctrl >f to bring up the search window. Now search for ShareButtons. You should see something similar to the above.


3/ Click on the black triangle to the left of the ShareButtons line to reveal more code. Place your cursor after the closing bracket of the ShareButtons line and press Enter to create a blank line.

4/ Copy the line of code below then paste it into the blank line you created.
 <b:if cond='data:blog.pageType == &quot;item&quot;'>

5/ Scroll down to the end of the share buttons code and you'll see it ends with '</b:includable>'. Create another blank line just above this and paste a closing
</b:if>
statement. Save your template and you are done. The share buttons should now be hidden from your blogger homepage and should only show on each blog post.

Hiding the Second Life Social Network buttons

If you have added the share buttons for the Second Life related social networking sites, you may want to hide these from the homepage too. To do so follow this extra step:


6/ Paste the code for the social networking buttons in the space you created for the closing '</b:if>' tag (the code can be found on the earlier tutorial linked to above). Now paste the closing '</b:if>'  tag directly after the code for the Second Life buttons. Save your template and all the share buttons should now only show on each blog post.

Editing a template can seem a little daunting, but so long as you have a backup of the original no lasting damage should be done, so feel free to give this tutorial a try.
Read More
Lusus

Share Buttons For Second Life Social Networks


Blogging about Second Life is a popular activity, especially for residents who have a defined interest in-world such as the arts, music and fashion etc. Along side this there are some prominent social network platforms that cater specifically for online 3D worlds, although for some reason it is not as easy to connect the two in the same way it is with, for example Facebook where share buttons are now part of the norm for any blog.

Although no platform owner has yet developed share buttons that enables blog readers to add their favourite content to these social networking sites, there is a work around. The idea is simple. Buttons placed are on a blog, much like Facebook, Twitter and Google+ buttons, and when clicked a small pop-up window appears so readers can quickly add the page to their Second Life social network site of choice, without leaving the blog. To get a better idea how these buttons work click on the ones at the bottom of this page.

There are two ways to add these share buttons to a blog. The first is the much simpler method of adding them to the sidebar and the second is to add them to the blog template where they will automatically appear in each blog post.

Adding The Share Buttons To The Sidebar


To add the buttons to your blog follow these steps:

1/ Sign into Blogger and then click on Layout for your blog.

2/ Drag your cursor over the following code then right click on your mouse and select copy.
<table>
  <tr>
    <th style='border:none: width:100%;'>
 <a href="#" onclick="window.open('http://avatarbook.org', 'newwindow', 'scrollbars=yes, toolbar=yes, width=700, height=600'); return false;" rel='nofollow'>
                        <img alt='Avatarbook' src='http://i65.tinypic.com/5wjdxz.jpg' style='padding-left:-5px; padding-right:3px' title='Share to Avatarbook. Opens in a new window'/>
                      </a>
<a href="#" onclick="window.open('http://www.avatarsocialnetwork.com', 'newwindow', 'scrollbars=yes, width=700, height=600'); return false;" rel='nofollow'>
                        <img alt='Avatar Social Network' src='http://i63.tinypic.com/10frr14.jpg' style='padding-right:3px' title='Share to Avatar Social Network. Opens in a new window'/>
                      </a>
<a href="#" onclick="window.open('https://sl-space.com', 'newwindow', 'scrollbars=yes, width=700, height=600'); return false;" rel='nofollow'>
                        <img alt='SL-Space' src='http://i66.tinypic.com/eaprh4.jpg' title='Share to SL-Space. Opens in a new window'/></a>
</th>
  </tr>
  <tr>
                        <!--please do not remove this credit -->
<th style='border:none; padding-bottom:10px; font:10px Roboto,arial,sans-serif; color:#666; width:35%'>Created by <a href="http://www.sl-inspiration.com">SL-Inspiration</a></th>
  </tr>
</table>
 3/ Now in the sidebar section of the blog layout, select Add a Gadget. In the window that opens select HTML/Javascript.


 4/ Another window will open and in the Content area paste the code, then give it a title if you wish to. Click Save, and the share buttons should appear on your sidebar.

 Adding The Share Buttons To The Blog Template

Before making changes to any blog template it is important to download a backup of the original, so it can be uploaded again later if needed. To do this:

1/ Sign into Blogger again and then choose Template from the drop down menu for your blog.

2/ To the top right of the template page click the Backup/Restore button, and in the Save window that opens give the template a meaningful name and hit Save. Your backup is complete.
.
To add the buttons to your template follow these steps:

1/ Sign into blogger, click on Template, then click the Edit HTML button.


 2/ Click anywhere inside the template window, and then hit Ctrl > f to bring up a search window. Use this window to find this line of code:
<b:include data='post' name='post'/>
As you can see from the example above this code can change from template to template, but search for something similar to the above.

3/ Now drag your cursor over the following code. Hit the right mouse button then select Copy.

                          <!-- SL Social Share Links-->
<table>
  <tr>
    <th style='border:none; width:35%; padding:0px;'>
      <a href="#" onclick="window.open('http://avatarbook.org/links/new', 'newwindow', 'scrollbars=yes, toolbar=yes, width=700, height=600'); return false;" rel='nofollow'>
                        <img alt='Avatarbook' src='http://i64.tinypic.com/9zsytv.jpg' style='padding-right:3px' title='Avatarbook Opens in a new window'/>
                      </a>
                      <a href="#" onclick="window.open('http://www.avatarsocialnetwork.com', 'newwindow', 'scrollbars=yes, width=700, height=600'); return false;" rel='nofollow'>
                        <img alt='Avatar Social Network' src='http://i63.tinypic.com/2h6ykx1.jpg' style='padding-right:3px' title='Avatar Social Network. Opens in a new window'/>
                     </a>
                      <a href="#" onclick="window.open('https://sl-space.com', 'newwindow', 'scrollbars=yes, width=700, height=600'); return false;" rel='nofollow'>
                        <img alt='SL-Space' src='http://i64.tinypic.com/2d9z8qv.jpg' title='SL-Space. Opens in a new window'/></a>
</th>
 <th style='border:none; width:55%; font:11px Roboto,arial,sans-serif; color:#666; padding:0px; '>Share to SL social networks</th>
  </tr>
                        <!-- please do not remove this credit-->
  <tr>
<th style='border:none; padding-bottom:10px; font:9px Roboto,arial,sans-serif; color:#666; width:35%'>Created by <a href="http://www.sl-inspiration.com">SL-Inspiration</a></th>
  </tr>
</table>
                          <!-- SL Social Share Links ends-->
 4/ If you want the share buttons to appear above each post content then paste the code above the line you searched for. For the buttons to appear below each post, paste below.

5/ Save the changes to your template and the buttons should now appear on your blog.

As all blog templates differ, it may be that your blog has more than one b:include data='post' name='post' line of code. If the buttons do not display in the correct place on your blog you may need to search for a second b:include data='post' name='post' in your template and add the share buttons script there.


 Displaying the Share Buttons Only On Blog Posts

Many templates will not show the standard Facebook, Twitter and Google+ share buttons on the blog homepage. If this is the case with your blog and you would prefer for the SL share buttons not to show on the homepage also, you will need to find the following line of code:
<b : include id='sharebuttons' var='post'>
1/ Once you have found this line you should see a black triangle to the left of it. Clicking it will reveal more code.


2/ Scroll down until you see this:
<data:post.dummyTag/>
Paste the SL share buttons code after the closing </b:if>.

3/ Save the template and the buttons should now appear after each post but not on the homepage.

 A final Note

As we have already mentioned, blogger templates can differ and it may be that the buttons appear more clustered on your blog than they do below. If this is the case try tweaking the width percentages in the first two lines that begin with
<th style='border:none.....
Increasing the percentage will give more room to the line you edit, but keep the total of both percentages to around 90%. Leave the third <th style='border:none..... exactly as it is.

Adding buttons for Second Life related social networks is easier than you may think, and can help to increase not only your readership but also the exposure of your favourite  social platforms. If you like this tutorial then why not share it! Also, check out our new SL-Inspiration Facebook page...we appreciate each 'like' we recieve.
Read More
Lusus

How To Add A Random Page Button To A Blogger Blog


After adding a random page button to this blog and to another I help to run, The Chilly Bear  I was asked a few times how to do this. So in the hope this will be useful I have decided to write this tutorial on how to add a random page button to a blogger blog.

Creating the Graphic For The Random Page Button

Firstly I should point out I am not a scripter so I didn't incorporate the button graphic into the javascript, but used the work around described here. If anyone knows how the graphic could be embedded into the script please add a comment below.

To create the button graphic you'll need to know the width of the sidebar on your blog where the button will appear. To find this:


1/ Open your Blogger Dashboard and on the blog you want to add the button to, click on the small arrow to the right of the blog name to reveal the drop down menu (highlighted in red above). Select Template.


2/ Click the Edit HTML button to view the blog template. 


3/ You'll need to view the blog's CSS file which will tell you the width of the sidebar. If you can't see the CSS of the blog find this line towards the top of the template:
<b:skin>......</b:skin>
then click on the triangle by the template line number (see image above).


4/ scroll down the blog CSS until you find a line similar to the above. As you can see in this example the width of the sidebar is 312px.

All CSS files are different for each blog template, so the line may appear differently for you, but there should be a line showing the width of the sidebar for your blog.

Now the we know the width of the sidebar we can begin to create the button graphics. Open your graphics software, select New then for the width of the graphic enter the width of the sidebar, and the height you want your graphic to be.

If you don't want your random page button to take up the full width of the sidebar, start with a transaparent layer and centre your button when you create it. When you export your graphic make sure it has an alpha channel so the background remains transparent.

You can be as creative as you like with the appearance of the button. Since the Chilly Bear is a Second Life club and music themed blog the button I created for it is a record label, (the image at the top of the page).

Once you have created the button graphic upload it to an image hosting website, such as Photobucket. You will need the code for direct layouts later.

Adding the Random Page Script To The Template

To create the random page button you will need to add a script to your template. Before you edit your template remember to create a backup by going to your template page and clicking the Backup/Restore button to the upper right.

1/ Copy the script Below:
<script type='text/javascript'>
/*<![CDATA[*/
function showLucky(root){ var feed = root.feed; var entries = feed.entry || []; var entry = feed.entry[0]; for (var j = 0; j < entry.link.length; ++j){if (entry.link[j].rel == 'alternate'){window.location = entry.link[j].href;}}} function fetchLuck(luck){ script = document.createElement('script'); script.src = '/feeds/posts/summary?start-index='+luck+'&max-results=1&alt=json-in-script&callback=showLucky'; script.type = 'text/javascript'; document.getElementsByTagName('head')[0].appendChild(script); } function feelingLucky(root){ var feed = root.feed; var total = parseInt(feed.openSearch$totalResults.$t,10); var luckyNumber = Math.floor(Math.random()*total);luckyNumber++; a = document.createElement('a'); a.href = '#random'; a.rel = luckyNumber; a.onclick = function(){fetchLuck(this.rel);}; a.innerHTML = 'Random Post'; document.getElementById('mbl-random').appendChild(a); } </script><script src="/feeds/posts/summary?max-results=0&alt=json-in-script&callback=feelingLucky">
/*]]>*/
</script>
2/  Go to your template page and click on the Edit HTML button to view the template.

3/ Scroll to the bottom of the page and just above the closing </body> tag paste the script.

4/ Save the template.

 Adding The Random Page Button To Your Blog

1/ To add your button, go to the Layout page of the blog and Click on Add A Gadget for the Sidebar.

2/ Select a HTML/Javascript widget and paste this into the window:
<div class='box'>
<div class='random page'>
  <div id='mbl-random'/>
<style type='text/css'>
#mbl-random a{
  display: block;
width:width of the button graphic;
height: height of the button graphic;
background: URL(url of the button) no-repeat 0 0;
font-size: 0px;
  }
</style>
</div>
</div>
3/ Replace 'width of the button graphic' with the width of your button in px. This should match the width of the sidebar.

4/  Replace 'height of the button graphic' with the height of your button.

5/ Replace 'url of the button' with the url for direct layout of the uploaded graphic.

6/ Click Save.

Your random page button should now appear on your blog

Troubleshooting

Because all templates are coded differently it may be that your random page button only appears on the home page of the blog. If this is the case you can make it appear on all pages by creating a widget for the button in the template.


1/ Open your template again and scroll down to where you see a line similar to the above, highlighted in red.


2/ Scroll further and you should see a search widget and as well as others, such as a social profile widget.

3/ Normally a random page button would be placed below these widgets, so when you scroll just past them add the following:
 <!--Random Page Widget-->
<div class='widget-container'>
<div class='random-button-widget'>
widget text
<div class='clear'/>
</div>
</div>
 Replace 'widget text' with the code you added to the sidebar widget when editing the layout.

5/ Save the template.

4/ Delete the widget you originally created when editing the layout.

Your random page button should now appear on each page.

Having a random page button on your blog can be very useful for bringing forward older posts that visitors may still find interesting, but were otherwise hidden among the numerous other posts you may have. It can also help to keep people on your blog for longer. If you find this tutorial useful then why not share it with friends.


Read More