Showing posts with label Downloads. Show all posts
Lusus

Retro Gaming Scripts For Gimp

 
The retro gaming scripts for Gimp manipulate images to give them, naturally enough, a retro gaming look. Or to describe them from another perspective, these scripts add different styles of dithering to your images. 
 
Altogether there are eleven different scripts, and each one imitates the style of various retro computers. For instance, there are three scripts dedicated to retro Amstrad graphics, four to the old BBC computers, and others that adopt the graphic styles of  the ZX Spectrum, Commodore, as well as a few others.

The reason I have decided to provide a download for these scripts is because, since the Gimp Repository closed, finding scripts has become in many cases very difficult. It doesn't help that most bloggers/article writers just post about the same old scripts, leaving out the less well known ones no matter how good they may be. This makes finding a diversity of scripts all but impossible.
 
Also, I have used these retro gaming scripts in the past and found they can be a goood method for transforming images from the ordinary. As such these scripts deserve to be made more widely available, so now they can be downloaded for free from my Ko-Fi store.

 
I should make it clear I did not make these scripts and would be happy to credit the original creator if they came forward, or if anyone knows who they are. The scripts are however, in the open source spirit of Gimp free to download, distribute and use, so no intellectual property infringement has been commited.


How to Install The retro Gaming Scripts In Gimp

It can be quite common for people to be unsure how to install scripts in Gimp, but just follow these few steps.

1/ Open where the scripts are located on the hard drive.

2/ Select the first script and hold down Shift. Now select the last script, which should result in all of them being selected.

3/ Right click and from the drop down menu select Copy.

4/ For the next step you'll need to make hidden items visible. To do this, open Windows Explorer, (the yellow folder icon usually available on the Taskbar).
 
 
Under the View tab click Hidden Items to the furthest right, so there is a tick in the box.
 
5/ There are a lot of folders to click on in this step. First in Windows Explorer click on Local Disk (C:) so you can see all of its contents in the main panel. Now double click on the following folders in turn to navigate to where to paste the scripts:

Users > [active user account name*]  > App Data > Roaming > Gimp > 2.10 > Scripts.
 
Paste the Gimp scripts in the Scripts folder. 

*the 'active user account name' will be the name of the folder for your Windows account. It could be your name or simply just User.
 

6/ Start up Gimp, and under the Filters menu there will now be a section named Retro Computing listing all of the installed scripts.

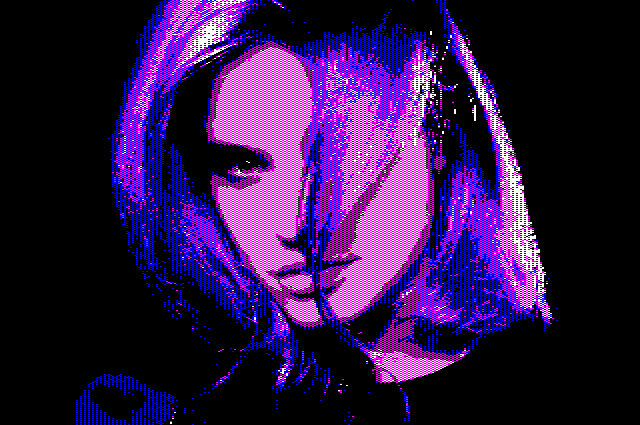
Below are a few images created using the retro gaming scripts.


The last two images were created a number of years ago, using a legacy Second Life avatar. 
 
The animated gif was created by making a short video of a rotating avatar head in Second Life, grabbing each frame using GAP in Gimp, (this is the best download I can find), then applying the same retro gaming script to each image. They were then all compiled into an animated gif.

How To Use The Retro Gaming Scripts


There really isn't a correct way to use these scripts since they encourage experimentation to arrive at images you'll like. However, here is a quick run through of how I created the above image. 

The image used is by Nick Brunner and can be downloaded here for free from Unsplash.


1/ Open the image in Gimp. Depending on the image used, it will probably need to be cropped and scaled since the retro gaming scripts work best with smaller files.


2/ The scripts also work best with the colours of the image reduced. To do this select Image > Mode > Indexed.


3/ In the window that opens enter the number of colours you want to use. Here 15 has been added. Now hit Convert.


4/ The image will now look like the above. To be able to use the scripts we now need to convert the image back to RGB. To do that select Image > Mode > RGB.


5/ In the window that opens just hit Convert.


6/ The image is now ready to use, although if you want you could adjust the colour saturation and play with the Curves option, both found under the Colors menu.

 
7/ To open a script, select Filters > Retro Computing, and from the drop down menu choose the one you want to use. Here BBC Micro (Mode2) has been selected.
 

8/ The script window opens. Most of the retro computing scripts have a number of options, each with a different retro look generated from each script. (It may be useful to know that the BBC Micro (Mode 4) script generates monochrome images). 
 
Once an option has been selected hit OK.
 

9/ The script will take a short while to work, and then you'll have your dithered, retro gaming image.

Read More
Lusus

Christmas Paper Cutout Collection For Affinity Designer


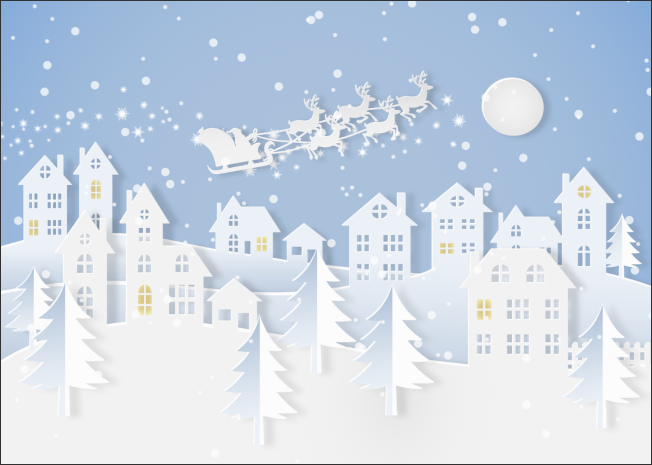
A digital image of santa and reindeer flying over houses. The image is in the style of paper cut out.

 
With Christmas on its way lots of people are thinking about decorations, greeting cards, as well as creating their own online festive themed designs. One popular and ever fashionable form of Christmas decoration is the paper cutout effect, and this collection for Affinity Designer will enable you to quickly and easily create your own designs for either personal or commerical use.
 
Once you've grabbed a copy of these Affinity Desiner Assets, head back here to view the tutorial on creating festive scenes with the collection.
 

What Is Included In The Christmas Paper Cutout Collection

The Christmas paper cutout collection includes many items.


Once the items have been added to Affinity Designer, under the Assets tab there will be a category called Christmas 1. This is divided into a number of subcategories to make finding what you want a little easier. All the subcategories contain either festive themed assets that have a cut out effect or flat items. 
 
The paper cutout items mostly consist of two layers (sometimes more) that have been grouped together. The bottom layer, as well as giving the item a little depth also contains an editable shadow effect. Most assets have both a paper cutout version as well as a flat one.


There are a number of snowflake designs as well as stars, fir trees, and fir tree sections that can be used to create personalised designs. There is also of course the traditional Santa in his sleigh.

 
As with pretty much all the assets these Christmas themed bells have a paper cutout version as well as a flat version, which adds to the options of how they can be used in your own designs.


There is also a collection of Christmas baubles. Although they are gold by default, they can be edited to be whatever colour you choose.

 
For outdoor Christmas scenes a collection of buildings is essential, Whilst there are fifteen buildings included, as well as a garage and picket fence, there are also some building parts so you can create your own and mix and match. A number of window shapes have been included so buildings can be created from scratch, and the windows used to save yourself some time.


Some of the basic shapes used to create the assets have been added to their own subcategory. They've been included so they can be used to help you create your own original assets. There is a collection of basic bauble shapes to which new patterns can be added, a basic bell shape, and some sections of snowflakes. There are also elements that can be used as is, such as the sparkles.
 

Colour Palette


The colour palette used to create the assets is included so any new designs you make will easily match the ones in the collection. The palette has been kept intentionally limited, but it can be used as inspiration for creating either new palettes or to extend the range of the original palette colours.
 

Brushes

These vector brushes make it easy to form decorative chains from which the baubles and bells can be attached. There are a number of star brushes because some look more natural as a horizontal chain, and others look better as vertical chains. This is easy to see by switching between brushes. 
 
The light coloured brushes don't change their colour very well, but all other brushes can be changed to any colour you like. There is also a mixture of flat looking brushes, and some with a little 3D depth.

Once loaded into Affinity Designer the raster brushes will be found under Pixel Persona. These brushes are intended to be more decorative than the vector alternatives, and can easily be edited by double clicking on them. (If you're concerned about messing up a brush, make a copy before editing).
 
There are a few snowflake themed brushes, as well as a few stars brushes, some twinkle brushes and a couple of basic snow brushes. The twinkle brushes look especially good with a subtle outer glow effect applied.

Styles


The styles allow you to use colour consistently throughout your designs, and most have been applied to the assets in the collection. The styles named 'shading' are used to apply a gradient colour to an item, and the styles named 'shadow' help to give each item a consistent shadow.

Scenes and Borders


To get you started quickly a number of paper cutout scenes and borders have been added. Just drag one from the Assets tab and use the align function to place accurately in the canvas area. Most have been created using an A2 setting. Some will need to be used on a landscape canvas, and others will need a portrait canvas. Its very apparent which is which.


Christmas Paper Cutout Examples

Below is a few examples of Christmas paper cutout scenes, as well as a website header and a background image, all created with this Affinity Designer Christmas paper cutout collection.  These scenes are quick and easy to create, and I'm sure you'll be creating incredible festive paper cutout scenes in no time.


Read More
Lusus

Creating Colour Palettes with Gimp


In the first two parts in this series of colour palette tutorials we showed How To Generate Colour Palettes With Palettable, Colormind, And Coolors, then then how to Create Colour Palettes Using Cyotek Palette Editor. In both cases colour schemes were created by starting with one colour then generating others to form a harmonious palette. In the first tutorial the palettes were exported as images, whilst the second showed how to export a palette as a native Gimp palette file.


This final colour palette tutorial will follow on from the others by showing how images in Gimp can be used to create colour palettes. It will then show how to import the Gimp palette file created in Cyotek. We begin however by explaining how to create colour palettes from gradients.


The Palettes Dockable Dialogue


Before we can work with palettes in Gimp, we need to make sure their dockable dialogues (tabs) are visible. In the standard Gimp set up the tabs can be seen top right (highlighted in green). If they're not visible select Windows > Dockable Dialogs > Palettes and they will appear.


Creating Colour Palettes With Gradients


Gimp comes with many gradients already added, and its easy to create your own. Whatever gradients are available, they can all be used to create colour palettes.


1/ With the Palettes tab active, right click anywhere in the list of palettes then select Import Palette.


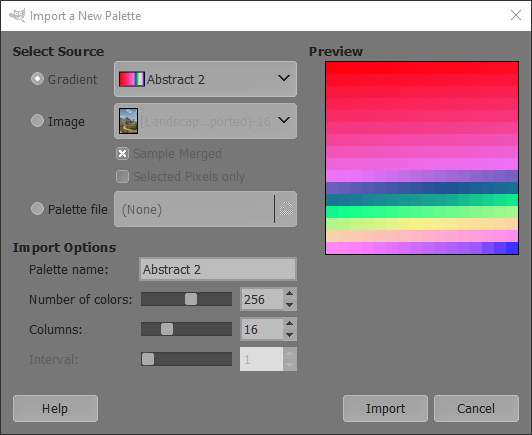
2/ The above window will appear. Select the Gradient radial button.


3/ From the drop down list, select a gradient to use.


4/ The colours for the palette will be displayed in the preview window. 


5/ The default number of colours for a palette is 256, but this can be edited with the Number of colors slider, (the total number of colours a palette can have in Gimp is around 10,000). The number of colours above has been changed to 35.


The default number of columns palettes are displayed in is 16, although this too can be edited, this time with the Columns slider.


When you're ready click Import


6/ The new palette will be visible, top right.


7/ The image above shows the palette with the Palette Editor tab active. In the space provided the name of the palette can be changed. Here its been changed to Gradient Palette Example.


Creating A Colour Palette From An Image Using The Colour Picker Tool

 
Probably the simplest way of creating a palette is to load an image in Gimp and use the Color Picker tool to select colours. 


1/ With an image loaded in Gimp, select the Palette tab, then right click anywhere in the list of palettes. From the drop down list select New Palette.


2/ A blank space will appear where the new palette will soon go.


3/ The palette can be given a name.


4/ Select the Color Picker tool from the Tools panel on the left. 


Because there are thousands of colours in this (and most) images the Sample Average option has been selected (highlighted in red). This will average out the colour within the radius of pixels selected. Here a radius of 9 has been used. This step is by no means essential, but it can be a good way of evening out colours and making them easier to select.


5/ Under the Color Picker tool options Use Info Window has also been selected. With the left mouse button held down, this window will show the colour under the cursor as it moves around the image.  Information about each colour will also be displayed, such as RGB colour percentages, the hex value and its X,Y coordinates.


6/  release the left mouse button and the selected colour will be added as the foreground colour, highlighted in red, above.


7/ Click the icon highlighted above to add the new foreground colour to the palette.


8/ Use the color Picker tool to select the next colour for the new palette. Add the colour to the palette by repeating step 7. Repeat this process until you have all the colours you need for the new palette.


Importing A Palette From An Image


1/ Although a standard image could be used for this method, the resulting palette would be made up of thousands of colours, so a work around is to change the image to a GIF which will limit the colours to 256.


The first step is to select  Image > precision > 8 bit integer, so the image exports correctly as a GIF.


2/ Export the image as a GIF.


3/ Load the GIF version of the image back into Gimp. With the Palette tab active right click anywhere in the list of palettes. From the drop down menu select Import Palette.


4/ The above window will open. Select the Image radial button and the preview area will show as many colours of the palette as will fit.


As you can see, the Number of colors slider is greyed out and can't be used. This is because a GIF image was used for the palette. If the inability to edit the number of colours is a problem the next method offers a better alternative.


When you're ready, hit the Import button.


5/ The palette can now be seen under the palettes tab.


6/ Under the Palette Editor tab the full range of colours in the palette can be seen, The palette can be renamed in the space provided.


Creating a Colour Palette From An Image


1/ As with the previous method of creating a palette from an image, the first step is selecting Image > Precision > 8 bit integer.


2/ Now select Image > Mode > Indexed.


3/ The above window will open. Select Generate optimum palette.


4/ As you could see in step 3 the maximum number of colours for this palette is 256. However, in this instance we don't need that many so this has been changed to 25. Here we can edit the number of colours for the palette, which we couldn't do when we turned the image into a GIF.


When you're ready hit the Convert button. 


6/ The new palette can now be seen under the Palettes tab.


7/ Although we can see the palette under the Palettes tab, if we were to close down Gimp the palette would be lost. To make sure the palette is saved click on it, then hit the duplicate icon, highlighted in green.


8/ Under the Palette Editor we can see the palette. 


When a palette is visible in the Palette Editor, it is the active palette, and if any palette color is clicked on, it will become the active foreground colour, seen to the left of Gimp. 


9/ The new palette can also be renamed in the space highlighted in red.


Importing a Palette File Into Gimp


As with many graphics software Gimp has its own native palettes file format. These palette files can be imported into, and exported out of Gimp.


In part two of this series on colour palettes we exported a palette file from Cyotek, and now we're going to import it into Gimp. If you'd like to see how this works for yourself, the colour palette file can be downloaded here. The file is stored on Google Drive so you can be sure its a safe download.


1/ With the Pallete tab active, right click anywhere within the list of palettes. From the drop down list select Import Palette.


2/ In the window that opens select the Palette file radial button. Click the icon highlighted in green.


3/ Using the window that opens, navigate to where the palette file is stored on your PC. Select it then hit the Open button.


4/  Now hit the Import button.


5/ The palette will now be added to the Palettes tab.


6/ The palette will also be visible in the Palette Editor tab, where it can be renamed etc, although its ready to use as it is.


Now that we've covered a lot of ground with calour palettes it should be much easier to generate a range of colours for a project. Colour seems an easy subject, until you start thinking about it, so hopefully this series of tutorials will take some of the guess work and stress out of using colour.


Read More