Showing posts with label Blogging. Show all posts
Lusus

Creating 360 Degree Panoramas For Second Life Part 2


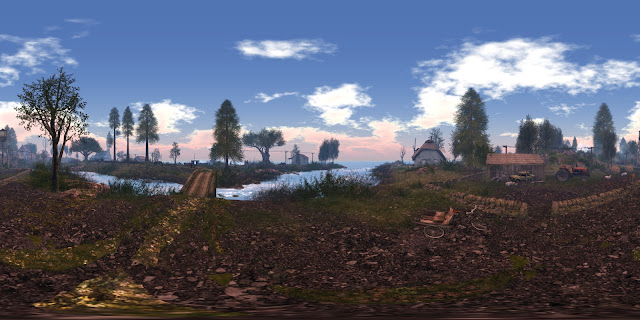
In the first part of this tutorial on creating 360 degree panoramas for Second Life, we looked at how to create the panoramic images using Hugin and ICE.

In this section we'll look at how to add meta data to the panoramic images, how to view the images on your desktop, and how to upload the panorama to Facebook. We'll then show how to embed the panorama on your blog or website.

Adding Meta Data To A Panoramic Image

There are a number of ways to add the necassary metadata to an image so online locations such as Facebook know to display tham as 360 degree views. In this tutorial however we're going to use Exif Fixer. Follow the link to download and install it onto your PC.


1/ When you first open Exif Fixer this is what you'll see. Open the folder where the panorama you created is located and drag the it to the display area of Exif Fixer.


2/ Exif Fixer should now look something like the above.


3/ If you click on the Exisiting Metadata button a window should pop up looking similar to the above.


4/ The text highlighted in blue to the right is the extra information we want to add to the image's metadata.

To the lower left is an option to either keep or delete the original image after the metadata has been added, highlighted in blue. Here the box is ticked for the original image to be deleted.

Time to click the Add Metadata button, highlighted in red.


5/ The window showing the original metadata should now look something like this, showing the extra information has been added to the panorama image. Exif Fixer can now be closed.

Previewing The 360 Degree Panorama On Your Desktop 

Previewing the panorama on your desktop isn't esssential but its helpful to see how good the image looks and to check for any blemishes before uploading it online. For this we'll need another small app, and the easiest to install is the LizardQ Viewer.


 1/ When LizardQ Viewer first opens it will look something like this, with the explorer window open to make it easy to navigate to the location of the panorama.


2/ This is the panorama loaded into the viewer. The edges or corner of the viewer can be dragged to resize the image area, or you can right click and from the menu select fullscreen.

To move around the image simply hold down the left mouse button and drag as you would with any 360 degree panorama, although one small quirk with LizardQ is you need to drag in the opposite direction to rotate the view as you would with an online image.

Once we're sure the image is good enough to upload online LizardQ can be closed by hitting Esc on the keyboard.

Uploading The 360 Degree Panorama To Facebook

One of the handiest locations to upload to and share 360 degree panoramas is Facebook, so this is what we'll do next. The process is very easy.


1/ Assuming you're already logged into your Facebook account, start to upload the panorama as you would with any image or video by hitting the Photo/Video button.


2/ The upload process will begin, and the double circle icon in the centre of the grey square indicates that Facebook recognises the image as a 360 degree panorama.


3/ Some text will need to be added. After the upload has finished an icon will appear in the bottom right of the thumbnail, highlighted in red. When clicked this will enable us to do a little editing to the panorama.


4/ When the icon is clicked this window will open so we can select the starting view. Drag the image so you get the view you want then hit the Save button.


5/ Now hit Share.


6/ The 360 degree panorama is now live on Facebook for everyone to see.

There is a Facebook group for 360 degree panoramas created in Second Life. Just click the link to view and join.

Panoramic images can also be uploaded to Flickr, in the same way as other images are uploaded, and there is a group for 360 degree panoramas created in Second Life. Panoramic images on Flickr can also be embedded on a blog, but the method described below looks much better.

Embedding a 360 Degree Panorama On A Blog

Once you've created a number of panoramas a blog is an excellent way of promoting your work. Firstly however you'll need to find a website that allows you to upload panoramas and provides a link for each image. There are a number of such locations online but we'll focus on one since the process of embedding the panorama will be very similar for all websites. The site we're going to use is Momento360.


1/ Once you've registered with Momento360 you'll see something similar to the above, which is the top part of their user's landing page. If you see something slightly different click on the My Media tab.

To upload a panorama hit the Upload button and follow the instructions. the process is very easy.


2/ Once the 360 degree panorama has uploaded click on it and you'll see something similar to the above. The image can be dragged and rotated just like the image uploaded to Facebook.

To embed the panorama we need to get the image link, so click on the icon highlighted in red.


3/ This drop down menu will  appear. Click on Share Or Embed A Link.


4/ This window will open. Click on the oval Copy button to copy the link to your clipboard.


5/ So we can embed the panorama we need to create an iframe code to add to the blog, so we'll use this website to generate it. There are a number of sites we could use, but  Makingdifferent is very good and keeps things simple.

When you follow the above link you'll see a simple form as above.


6/ In the top space we name our iframe code. In the space below that called iFrame URL we paste the link we copied from Momento360.

In the next couple of spaces we add the width and height we want the panorama to be on the blog. Select No for Show Border, then hit the Generate button at the bottom of the form.


7/ The above window will appear. Hit the Copy To Clipboard button to copy the iframe code.


8/ We can now paste the iframe code to a blog post so the 360 degree panorama will be embedded.

From the Blogger dashboard hit the New Post button, then select the HTML tab. Now paste the iframe code. If you return to the Compose tab you should see the embedded panorama, although it may take a moment to load.

Add more content to the blog post if you want to then hit the Publish button.


Your embedded panorama should look similar to the above, and can be dragged to rotate the view, just like the panorama on Facebook and Momento360. It may be a good idea to link to the original panorama on Momento360 because the site offers excellent fullscreen views. Double click on the panorama above to zoom in and out.

Bonus Tip

Thats essentially all that part 2 of the series on 360 degree panoramas for Second Life set out to cover, but we have a little bonus tip on how to view your image inworld as media on a prim. To begin with, make sure you have the link copied from Momento360, as shown above.


 1/ The above image shows a prim face resting on another prim. Right click on the prim and select Edit to open the Edit panel.


2/ To the top left choose Select Face, then click on the prim face visible in the first image above.

In the area highlighted in red select Media from the dropdown menu. Now hit the Choose button, highlighted in blue.


3/ The above window will open. Under the General tab paste the copied link into the area highlighted in red.  Selecting Auto Zoom is optional.

Hit the Apply button. A thumbnail of the panorama should appear in the window, although it may take a while to show.


4/ Under the Customize tab you can select whether to show a navigation bar above the prim and who can use it. As the prim is going to be used only for the panorama, all the options here have been unchecked. When you're ready click OK.


The prim now shows the 360 panorama and whilst it is as interactive as the image on Facebook and Momento360, it should be expected that its much slower to respond. This is however still a quite a novel way of viewing panoramas.

This completes the second part of our tutorials on 360 degree panoramas for Second Life, and we hope they have been very useful to you. Enjoy creating and sharing your images.
Read More
Lusus

Add An Animated Favicon To Blogger


Adding a standard favicon to a blog is a good way to make it instantly recognisable, but this can be taken further by adding an animated favicon. Unfortunately not all browsers will show the animated favicon but for those that do such as Firefox its worth making the effort to add an extra touch of style to your blog.

Creating The Favicon

The first thing you'll need is a small animated gif to use as the animated favicon, and this can be created in a number of ways. If you'd like to create a rotating logo style gif for your favicon then as a SL resident why not make use of the tools within Second Life.


As an example, the image above shows a cube created in Second Life with a texture of the SL-Inspiration logo added to all the sides. If a rotation script is added to the cube, then this can be used as the basis for an animated favicon. Your own animation doesn't need to be a cube, in fact it can be anything you want to create, although it pays to remember the animation will eventually have to be no bigger than 32 X 32px.

If you don't have a rotation script to add to a prim then copy and paste the script below and add it to the object's contents.

default
{
    state_entry()
    {
       llTargetOmega(<0,0,1>,0.6,PI);
    }
}
 Changing the value of the '1' will change how quickly the object will rotate.

Recording The Animation

If you are creating the animated gif within Second Life then possibly the most effective way to record it is with gif creation software rather than using something like Fraps. It will just save  a lot of time and effort.

There are a number of gif creation tools available, some are free and some cost. My personal choices are firstly GifCam which is free, and Giffing Tool, which is also free if you don't mind small credit text at the bottom of the gif, otherwise pay what you want for it to remove that text. Of these two Giffing Tool is much more convenient to use and worth paying a small price for to remove the credits, and it is the software used in this tutorial.


Before starting up the gif recording software it can be helpful to rez a prim in front of your rotating cube and focus the camera on it, then before recording make the prim transparent. If you need to refocus on the prim you can use the viewer's hide/show transparencies feature [Ctrl+Alt+T]. I find using the prim is an easier way of centering the camera on the cube, which can be tricky when its rotating. (The image above doesn't show the camera focused correctly, the angle has been changed to show the arrangement of the cube and the prim).


When you are ready, start up (in this instance) Giffing Tool and a window as above will appear. Click on New and a rectangle will appear which can be sized to the area of the screen you want to record. Hold down the left mouse button and drag to create the area to be captured. Once the left mouse button is released Giffing Tool will start recording. To stop recording hit the Esc key on the keyboard.


It may take a little while for Giffing Tool to load the recorded gif, but it will eventually look something like the image above. The important areas have been highlighted in different colours.

The yellow area shows the play/stop/rewind controls.

After recording your SL cube the resulting gif will probably contain far too many frames to make it practical to use as a favicon. The area highlighted in red shows the tool for removing frames. A typical use would be to remove every other frame from the entire gif. Ideally the maximum number of frames should not exeed 60. Also, the animated gif should not exceed 100kb if its to be used as an animated favicon.

Once frames have been removed from the gif you can test how it looks by using the playback tools. The chances are it will look wrong, but this can be adjusted by changing the frame rate, highlighted in dark blue. Removing frames and adjusting the frame rate can be something of a balancing act.

The next step will be to crop the animated gif to remove any unwanted background space. The more of the gif the logo takes up rather than the background the clearer it will be as a favicon. To remove some of the background, use the crop tool, highlighted in pale blue. Click it and drag it around the area you want to keep. It can be adjusted after you release the mouse button.

The last step is to resize the animation to use as a favicon. The prefered sizes are either 32X32px or 16X16px. Use the area highlighted in purple to resize the animated gif. Before you do so however save a copy of the gif full size in case you want to make other changes later. It is also worth mentioning there is no undo button in Giffing Tool, so saving a number of gifs (with different names so they don't overwrite each other) maybe a good idea.

Finally save the animated gif by clicking on the icon highlighted in green, then name the gif and click OK.

The appearance of the animated gif can be tested by right clicking on the saved gif, selecting  Open With and then choosing your preferred browser from the drop down list.

Adding The Animated Gif To Blogger

Once you are happy with the animated gif you've created its time to add it to blogger as an animated favicon.

1/ Firstly, upload the animated gif to your favourite image hosting website such as Photobucket, then copy the code for direct layouts. Now paste it into Notepad (or similar).

2/ Now paste this code also to Notepad:
<link href='YOUR FAVICON URL HERE' rel='icon' type='image/gif'/>
 3/ replace 'YOUR FAVICON URL HERE' with the direct layout code, keeping the quotation marks, then copy the entire line of code you just edited.


 4/ Go to the Blogger Dashboard and select the template option. Make a backup of your template just to be safe.Then click on the Edit HTML button.

5/ Just below the Meta content tags towards the top of the template paste the favicon code, then click the Save Template button. Your animated favicon should now be visible in your browser when you next view your blog. Thats all there is to creating an animated favicon for your blog!


Extra Information


A rotating cube is not the only possibility for an animated favicon as the above gif demonstrates. If this is something you would like to explore, then you'd need to look at other software options.

One reasonably priced option is  Xara 3D Maker which after a cursory look seems good value. However, if all you want to create is one animated gif, it might not be too economical.

A very good website that allows you to create animated favicons online is conveniently called Animatedfavicon.com. It won't create an animation as stylish as the one above but it will allow users to upload a logo that will be transformed into a favicon with scrolling text. Follow the onscreen instructions to create the favicon then scroll down to the 'Get it now' button to download.

The animated gif will be downloaded as a zip file. Once its been uncompressed look for the gif file in the folder, then add it to your favourite image hosting site. Then use the direct layout code as described above.

If you would like a personalised animated favicon created especially for you and your blog then feel free to contact me and I will be happy to discuss what you would like. But for those who would prefer to get creative, enjoy adding your own favicon inspirations to your blogs.
Read More
Lusus

How To Hide Share Buttons On A Blogger Homepage

In a recent post I mentioned how to add share buttons for Second Life related social networks to Blogger, and I also mentioned in passing that not all Blogger templates hide the standard share buttons on the homepage. If this is the case with your blog, then this quick tutorial will explain how to hide the share buttons on Blogger, so that they only appear on a blog post.

Before making any changes to a template it is strongly recommended that you download a backup. If you don't know how to do this, then the earlier post linked to above will explain how. Now just follow these steps:

1/ Sign into Blogger then select Template then Edit HTML.


2/ click inside the template area, then hit Ctrl >f to bring up the search window. Now search for ShareButtons. You should see something similar to the above.


3/ Click on the black triangle to the left of the ShareButtons line to reveal more code. Place your cursor after the closing bracket of the ShareButtons line and press Enter to create a blank line.

4/ Copy the line of code below then paste it into the blank line you created.
 <b:if cond='data:blog.pageType == &quot;item&quot;'>

5/ Scroll down to the end of the share buttons code and you'll see it ends with '</b:includable>'. Create another blank line just above this and paste a closing
</b:if>
statement. Save your template and you are done. The share buttons should now be hidden from your blogger homepage and should only show on each blog post.

Hiding the Second Life Social Network buttons

If you have added the share buttons for the Second Life related social networking sites, you may want to hide these from the homepage too. To do so follow this extra step:


6/ Paste the code for the social networking buttons in the space you created for the closing '</b:if>' tag (the code can be found on the earlier tutorial linked to above). Now paste the closing '</b:if>'  tag directly after the code for the Second Life buttons. Save your template and all the share buttons should now only show on each blog post.

Editing a template can seem a little daunting, but so long as you have a backup of the original no lasting damage should be done, so feel free to give this tutorial a try.
Read More
Lusus

Share Buttons For Second Life Social Networks


Blogging about Second Life is a popular activity, especially for residents who have a defined interest in-world such as the arts, music and fashion etc. Along side this there are some prominent social network platforms that cater specifically for online 3D worlds, although for some reason it is not as easy to connect the two in the same way it is with, for example Facebook where share buttons are now part of the norm for any blog.

Although no platform owner has yet developed share buttons that enables blog readers to add their favourite content to these social networking sites, there is a work around. The idea is simple. Buttons placed are on a blog, much like Facebook, Twitter and Google+ buttons, and when clicked a small pop-up window appears so readers can quickly add the page to their Second Life social network site of choice, without leaving the blog. To get a better idea how these buttons work click on the ones at the bottom of this page.

There are two ways to add these share buttons to a blog. The first is the much simpler method of adding them to the sidebar and the second is to add them to the blog template where they will automatically appear in each blog post.

Adding The Share Buttons To The Sidebar


To add the buttons to your blog follow these steps:

1/ Sign into Blogger and then click on Layout for your blog.

2/ Drag your cursor over the following code then right click on your mouse and select copy.
<table>
  <tr>
    <th style='border:none: width:100%;'>
 <a href="#" onclick="window.open('http://avatarbook.org', 'newwindow', 'scrollbars=yes, toolbar=yes, width=700, height=600'); return false;" rel='nofollow'>
                        <img alt='Avatarbook' src='http://i65.tinypic.com/5wjdxz.jpg' style='padding-left:-5px; padding-right:3px' title='Share to Avatarbook. Opens in a new window'/>
                      </a>
<a href="#" onclick="window.open('http://www.avatarsocialnetwork.com', 'newwindow', 'scrollbars=yes, width=700, height=600'); return false;" rel='nofollow'>
                        <img alt='Avatar Social Network' src='http://i63.tinypic.com/10frr14.jpg' style='padding-right:3px' title='Share to Avatar Social Network. Opens in a new window'/>
                      </a>
<a href="#" onclick="window.open('https://sl-space.com', 'newwindow', 'scrollbars=yes, width=700, height=600'); return false;" rel='nofollow'>
                        <img alt='SL-Space' src='http://i66.tinypic.com/eaprh4.jpg' title='Share to SL-Space. Opens in a new window'/></a>
</th>
  </tr>
  <tr>
                        <!--please do not remove this credit -->
<th style='border:none; padding-bottom:10px; font:10px Roboto,arial,sans-serif; color:#666; width:35%'>Created by <a href="http://www.sl-inspiration.com">SL-Inspiration</a></th>
  </tr>
</table>
 3/ Now in the sidebar section of the blog layout, select Add a Gadget. In the window that opens select HTML/Javascript.


 4/ Another window will open and in the Content area paste the code, then give it a title if you wish to. Click Save, and the share buttons should appear on your sidebar.

 Adding The Share Buttons To The Blog Template

Before making changes to any blog template it is important to download a backup of the original, so it can be uploaded again later if needed. To do this:

1/ Sign into Blogger again and then choose Template from the drop down menu for your blog.

2/ To the top right of the template page click the Backup/Restore button, and in the Save window that opens give the template a meaningful name and hit Save. Your backup is complete.
.
To add the buttons to your template follow these steps:

1/ Sign into blogger, click on Template, then click the Edit HTML button.


 2/ Click anywhere inside the template window, and then hit Ctrl > f to bring up a search window. Use this window to find this line of code:
<b:include data='post' name='post'/>
As you can see from the example above this code can change from template to template, but search for something similar to the above.

3/ Now drag your cursor over the following code. Hit the right mouse button then select Copy.

                          <!-- SL Social Share Links-->
<table>
  <tr>
    <th style='border:none; width:35%; padding:0px;'>
      <a href="#" onclick="window.open('http://avatarbook.org/links/new', 'newwindow', 'scrollbars=yes, toolbar=yes, width=700, height=600'); return false;" rel='nofollow'>
                        <img alt='Avatarbook' src='http://i64.tinypic.com/9zsytv.jpg' style='padding-right:3px' title='Avatarbook Opens in a new window'/>
                      </a>
                      <a href="#" onclick="window.open('http://www.avatarsocialnetwork.com', 'newwindow', 'scrollbars=yes, width=700, height=600'); return false;" rel='nofollow'>
                        <img alt='Avatar Social Network' src='http://i63.tinypic.com/2h6ykx1.jpg' style='padding-right:3px' title='Avatar Social Network. Opens in a new window'/>
                     </a>
                      <a href="#" onclick="window.open('https://sl-space.com', 'newwindow', 'scrollbars=yes, width=700, height=600'); return false;" rel='nofollow'>
                        <img alt='SL-Space' src='http://i64.tinypic.com/2d9z8qv.jpg' title='SL-Space. Opens in a new window'/></a>
</th>
 <th style='border:none; width:55%; font:11px Roboto,arial,sans-serif; color:#666; padding:0px; '>Share to SL social networks</th>
  </tr>
                        <!-- please do not remove this credit-->
  <tr>
<th style='border:none; padding-bottom:10px; font:9px Roboto,arial,sans-serif; color:#666; width:35%'>Created by <a href="http://www.sl-inspiration.com">SL-Inspiration</a></th>
  </tr>
</table>
                          <!-- SL Social Share Links ends-->
 4/ If you want the share buttons to appear above each post content then paste the code above the line you searched for. For the buttons to appear below each post, paste below.

5/ Save the changes to your template and the buttons should now appear on your blog.

As all blog templates differ, it may be that your blog has more than one b:include data='post' name='post' line of code. If the buttons do not display in the correct place on your blog you may need to search for a second b:include data='post' name='post' in your template and add the share buttons script there.


 Displaying the Share Buttons Only On Blog Posts

Many templates will not show the standard Facebook, Twitter and Google+ share buttons on the blog homepage. If this is the case with your blog and you would prefer for the SL share buttons not to show on the homepage also, you will need to find the following line of code:
<b : include id='sharebuttons' var='post'>
1/ Once you have found this line you should see a black triangle to the left of it. Clicking it will reveal more code.


2/ Scroll down until you see this:
<data:post.dummyTag/>
Paste the SL share buttons code after the closing </b:if>.

3/ Save the template and the buttons should now appear after each post but not on the homepage.

 A final Note

As we have already mentioned, blogger templates can differ and it may be that the buttons appear more clustered on your blog than they do below. If this is the case try tweaking the width percentages in the first two lines that begin with
<th style='border:none.....
Increasing the percentage will give more room to the line you edit, but keep the total of both percentages to around 90%. Leave the third <th style='border:none..... exactly as it is.

Adding buttons for Second Life related social networks is easier than you may think, and can help to increase not only your readership but also the exposure of your favourite  social platforms. If you like this tutorial then why not share it! Also, check out our new SL-Inspiration Facebook page...we appreciate each 'like' we recieve.
Read More
Lusus

How To Add A Random Page Button To A Blogger Blog


After adding a random page button to this blog and to another I help to run, The Chilly Bear  I was asked a few times how to do this. So in the hope this will be useful I have decided to write this tutorial on how to add a random page button to a blogger blog.

Creating the Graphic For The Random Page Button

Firstly I should point out I am not a scripter so I didn't incorporate the button graphic into the javascript, but used the work around described here. If anyone knows how the graphic could be embedded into the script please add a comment below.

To create the button graphic you'll need to know the width of the sidebar on your blog where the button will appear. To find this:


1/ Open your Blogger Dashboard and on the blog you want to add the button to, click on the small arrow to the right of the blog name to reveal the drop down menu (highlighted in red above). Select Template.


2/ Click the Edit HTML button to view the blog template. 


3/ You'll need to view the blog's CSS file which will tell you the width of the sidebar. If you can't see the CSS of the blog find this line towards the top of the template:
<b:skin>......</b:skin>
then click on the triangle by the template line number (see image above).


4/ scroll down the blog CSS until you find a line similar to the above. As you can see in this example the width of the sidebar is 312px.

All CSS files are different for each blog template, so the line may appear differently for you, but there should be a line showing the width of the sidebar for your blog.

Now the we know the width of the sidebar we can begin to create the button graphics. Open your graphics software, select New then for the width of the graphic enter the width of the sidebar, and the height you want your graphic to be.

If you don't want your random page button to take up the full width of the sidebar, start with a transaparent layer and centre your button when you create it. When you export your graphic make sure it has an alpha channel so the background remains transparent.

You can be as creative as you like with the appearance of the button. Since the Chilly Bear is a Second Life club and music themed blog the button I created for it is a record label, (the image at the top of the page).

Once you have created the button graphic upload it to an image hosting website, such as Photobucket. You will need the code for direct layouts later.

Adding the Random Page Script To The Template

To create the random page button you will need to add a script to your template. Before you edit your template remember to create a backup by going to your template page and clicking the Backup/Restore button to the upper right.

1/ Copy the script Below:
<script type='text/javascript'>
/*<![CDATA[*/
function showLucky(root){ var feed = root.feed; var entries = feed.entry || []; var entry = feed.entry[0]; for (var j = 0; j < entry.link.length; ++j){if (entry.link[j].rel == 'alternate'){window.location = entry.link[j].href;}}} function fetchLuck(luck){ script = document.createElement('script'); script.src = '/feeds/posts/summary?start-index='+luck+'&max-results=1&alt=json-in-script&callback=showLucky'; script.type = 'text/javascript'; document.getElementsByTagName('head')[0].appendChild(script); } function feelingLucky(root){ var feed = root.feed; var total = parseInt(feed.openSearch$totalResults.$t,10); var luckyNumber = Math.floor(Math.random()*total);luckyNumber++; a = document.createElement('a'); a.href = '#random'; a.rel = luckyNumber; a.onclick = function(){fetchLuck(this.rel);}; a.innerHTML = 'Random Post'; document.getElementById('mbl-random').appendChild(a); } </script><script src="/feeds/posts/summary?max-results=0&alt=json-in-script&callback=feelingLucky">
/*]]>*/
</script>
2/  Go to your template page and click on the Edit HTML button to view the template.

3/ Scroll to the bottom of the page and just above the closing </body> tag paste the script.

4/ Save the template.

 Adding The Random Page Button To Your Blog

1/ To add your button, go to the Layout page of the blog and Click on Add A Gadget for the Sidebar.

2/ Select a HTML/Javascript widget and paste this into the window:
<div class='box'>
<div class='random page'>
  <div id='mbl-random'/>
<style type='text/css'>
#mbl-random a{
  display: block;
width:width of the button graphic;
height: height of the button graphic;
background: URL(url of the button) no-repeat 0 0;
font-size: 0px;
  }
</style>
</div>
</div>
3/ Replace 'width of the button graphic' with the width of your button in px. This should match the width of the sidebar.

4/  Replace 'height of the button graphic' with the height of your button.

5/ Replace 'url of the button' with the url for direct layout of the uploaded graphic.

6/ Click Save.

Your random page button should now appear on your blog

Troubleshooting

Because all templates are coded differently it may be that your random page button only appears on the home page of the blog. If this is the case you can make it appear on all pages by creating a widget for the button in the template.


1/ Open your template again and scroll down to where you see a line similar to the above, highlighted in red.


2/ Scroll further and you should see a search widget and as well as others, such as a social profile widget.

3/ Normally a random page button would be placed below these widgets, so when you scroll just past them add the following:
 <!--Random Page Widget-->
<div class='widget-container'>
<div class='random-button-widget'>
widget text
<div class='clear'/>
</div>
</div>
 Replace 'widget text' with the code you added to the sidebar widget when editing the layout.

5/ Save the template.

4/ Delete the widget you originally created when editing the layout.

Your random page button should now appear on each page.

Having a random page button on your blog can be very useful for bringing forward older posts that visitors may still find interesting, but were otherwise hidden among the numerous other posts you may have. It can also help to keep people on your blog for longer. If you find this tutorial useful then why not share it with friends.


Read More