How To Create A Facebook 3D Image Using A Second Life Photograph
By
20:18:00
One of Facebook's recent innovations is allowing users to create 3D images generated from a single photo. Whilst this is usually done using a standard photograph, it also works with images captured from Second Life. Although Facebook posts can be embedded into websites, if you can't see the 3D image below, try clicking the link here.
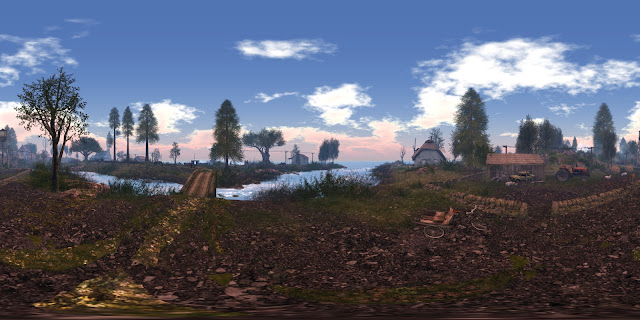
The image we're using for this tutorial shows a sculpture called 'Invisible' by the renown Second Life artist Mistero Hifeng. It can be seen at the Lundy Art Gallery and Museum. Click the link to visit.
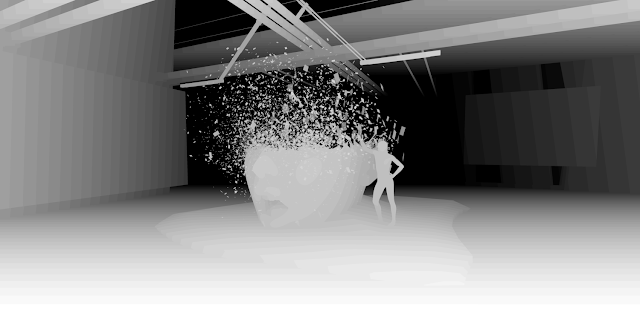
A depth map is an image that maps out areas of a corresponding photograph in light and dark tones. Facebook uses these depth maps to calculate what parts of an image are in the foreground and which are receding. The lighter a tone the nearer to the foreground it is, and of course the darker the tone the more it recedes. This information is used to produce a parallax effect, which in turn creates a sense of 3D.
The above image is an example of a depth map and corresponds to the image below. When both are uploaded to Facebook together, they generate the 3D image.
For a standard photograph, its depth map would need to be created in software such as Gimp or Photoshop, which can be a slow and involved process.
However, both Firestorm and the official viewer (and maybe others) have a built in function to create depth maps, which means turning Second Life pics into 3D images is greatly simplified.

When taking snapshots in Second Life to turn into good 3D images it helps if a few things are kept in mind. For more detailed information on this visit LAB3D on Facebook which is a group for people who create 3D images. The tips below however will help to get you started quickly.
Firstly, large images work better than smaller ones. The recommended dimensions are 3024 x 4032px (portrait) or 4032px x 3024 (landscape). Having said that, smaller image sizes can sometimes work well, (the image used in the example here, after being cropped is smaller than the recommended dimensions), so a little experimentation might be needed.
Images that have a clear point of focus work much better than ones that have a busy and cluttered subject matter.
As explained above, the illusion of 3D is created when Facebook uses the darker and lighter areas of a depth map to create a parallax effect. Although you may intuitively aim for a large parallax effect by creating big contrasts in depth map tones, the best images use subtle tone differences.
For this reason its best to create a depth map with not too much dark and light contrast. Also, tones that are too light or too dark should be avoided. A range between the hex values of #202020 for dark tones, and #707070 for light areas is ideal.

1/ Take the snapshot in the usual way in Second Life, but keep the Snapshot window open afterwards, and don't move your camera.
In the Capture drop down menu select Depth, highlighted in red above. From the Filter drop down menu select Negative highlighted in blue above.
If a preview of the depth map doesn't show, hit Refresh.
When saving the depth map image select Save As to make sure it saves correctly. Its also wise to view it once saved, because if it hasn't saved correctly it will just save as a standard image.
If there is movement in your subject matter, such as avatars walking or dancing, before you take any snapshot check the Freeze frame option, highlighted in green above, to ensure you use the same static image for the photogragh and depth map.

2/ Load both the image and depth map into Gimp as layers.

3/ Using the Rectangle Select tool, highlighted in red above, draw a rectangle around the area of the image to be used.
4/ Now select Image > Crop to selection.
5/ Give the depth map image (not the photograph) a slight blur by selecting Filter > Blur > Gaussian blur
6/ Export each layer, giving them either a png or jpg extension.
How the depth map image is named when its exported is important. It should follow the example below:
<image name>_depth.png
Therefore, if you have an image named Portrait the two files will be named:
Portait.png = the photo file
Portrait_depth.png = the depth map file.
Naming the files this way lets Facebook know the images will be used to create a 3D effect.

1/ Open Facebook and go to your timeline. At the top of the page click on Photo/Video so you see the above.

2/ Open the folder where your two images are located. Hold down Ctrl, click on the first image then the second so both are selected. Now drag them to the space above which says 'Whats on Your Mind?'
Its important you drag both the image files together to let Facebook know to use them to create a 3D image.

4/ The images will now start uploading.

5/ You'll now see a window similar to the above whilst Facebook creates the 3D image.

6/ Once the 3D image has been created click on the Post tab at the bottom of the image window.

Your image should now look 3D and be ready to share with the world.
Using a Second Life viewer to create the depth map saves a lot of time and effort, although it does have its limitations. For example, its not easy to limit the depth map's light and dark tones, which as noted above would produce a better parallax effect. The depth map can however still be edited in software such as Gimp or Photoshop to add or change tones, if you have the patience to do so.
On a final note, if you want to create 3D images with RL photos, take a look at OmniVirt. This website allows you to upload an image, from which a depth map can be generated. The depth map will probably not be perfect since this function is still in beta and will need further editing, but this is a much better way of creating the depth map than starting from scratch.
The image we're using for this tutorial shows a sculpture called 'Invisible' by the renown Second Life artist Mistero Hifeng. It can be seen at the Lundy Art Gallery and Museum. Click the link to visit.
What Is A Depth Map?

The above image is an example of a depth map and corresponds to the image below. When both are uploaded to Facebook together, they generate the 3D image.
For a standard photograph, its depth map would need to be created in software such as Gimp or Photoshop, which can be a slow and involved process.
However, both Firestorm and the official viewer (and maybe others) have a built in function to create depth maps, which means turning Second Life pics into 3D images is greatly simplified.
Tips On Creating A Good starting Image

When taking snapshots in Second Life to turn into good 3D images it helps if a few things are kept in mind. For more detailed information on this visit LAB3D on Facebook which is a group for people who create 3D images. The tips below however will help to get you started quickly.
Firstly, large images work better than smaller ones. The recommended dimensions are 3024 x 4032px (portrait) or 4032px x 3024 (landscape). Having said that, smaller image sizes can sometimes work well, (the image used in the example here, after being cropped is smaller than the recommended dimensions), so a little experimentation might be needed.
Images that have a clear point of focus work much better than ones that have a busy and cluttered subject matter.
As explained above, the illusion of 3D is created when Facebook uses the darker and lighter areas of a depth map to create a parallax effect. Although you may intuitively aim for a large parallax effect by creating big contrasts in depth map tones, the best images use subtle tone differences.
For this reason its best to create a depth map with not too much dark and light contrast. Also, tones that are too light or too dark should be avoided. A range between the hex values of #202020 for dark tones, and #707070 for light areas is ideal.
Creating A 3D Photograph Using A Second Life Image

1/ Take the snapshot in the usual way in Second Life, but keep the Snapshot window open afterwards, and don't move your camera.
In the Capture drop down menu select Depth, highlighted in red above. From the Filter drop down menu select Negative highlighted in blue above.
If a preview of the depth map doesn't show, hit Refresh.
When saving the depth map image select Save As to make sure it saves correctly. Its also wise to view it once saved, because if it hasn't saved correctly it will just save as a standard image.
If there is movement in your subject matter, such as avatars walking or dancing, before you take any snapshot check the Freeze frame option, highlighted in green above, to ensure you use the same static image for the photogragh and depth map.
2/ Load both the image and depth map into Gimp as layers.

3/ Using the Rectangle Select tool, highlighted in red above, draw a rectangle around the area of the image to be used.
4/ Now select Image > Crop to selection.
5/ Give the depth map image (not the photograph) a slight blur by selecting Filter > Blur > Gaussian blur
6/ Export each layer, giving them either a png or jpg extension.
How the depth map image is named when its exported is important. It should follow the example below:
<image name>_depth.png
Therefore, if you have an image named Portrait the two files will be named:
Portait.png = the photo file
Portrait_depth.png = the depth map file.
Naming the files this way lets Facebook know the images will be used to create a 3D effect.
Uploading The Images To Facebook
1/ Open Facebook and go to your timeline. At the top of the page click on Photo/Video so you see the above.
2/ Open the folder where your two images are located. Hold down Ctrl, click on the first image then the second so both are selected. Now drag them to the space above which says 'Whats on Your Mind?'
Its important you drag both the image files together to let Facebook know to use them to create a 3D image.
4/ The images will now start uploading.
5/ You'll now see a window similar to the above whilst Facebook creates the 3D image.
6/ Once the 3D image has been created click on the Post tab at the bottom of the image window.
Your image should now look 3D and be ready to share with the world.
Using a Second Life viewer to create the depth map saves a lot of time and effort, although it does have its limitations. For example, its not easy to limit the depth map's light and dark tones, which as noted above would produce a better parallax effect. The depth map can however still be edited in software such as Gimp or Photoshop to add or change tones, if you have the patience to do so.
On a final note, if you want to create 3D images with RL photos, take a look at OmniVirt. This website allows you to upload an image, from which a depth map can be generated. The depth map will probably not be perfect since this function is still in beta and will need further editing, but this is a much better way of creating the depth map than starting from scratch.