Creating Colour Palettes with Gimp

In the first two parts in this series of colour palette tutorials we showed How To Generate Colour Palettes With Palettable, Colormind, And Coolors, then then how to Create Colour Palettes Using Cyotek Palette Editor. In both cases colour schemes were created by starting with one colour then generating others to form a harmonious palette. In the first tutorial the palettes were exported as images, whilst the second showed how to export a palette as a native Gimp palette file.
This final colour palette tutorial will follow on from the others by showing how images in Gimp can be used to create colour palettes. It will then show how to import the Gimp palette file created in Cyotek. We begin however by explaining how to create colour palettes from gradients.
The Palettes Dockable Dialogue

Before we can work with palettes in Gimp, we need to make sure their dockable dialogues (tabs) are visible. In the standard Gimp set up the tabs can be seen top right (highlighted in green). If they're not visible select Windows > Dockable Dialogs > Palettes and they will appear.
Creating Colour Palettes With Gradients
Gimp comes with many gradients already added, and its easy to create your own. Whatever gradients are available, they can all be used to create colour palettes.

1/ With the Palettes tab active, right click anywhere in the list of palettes then select Import Palette.

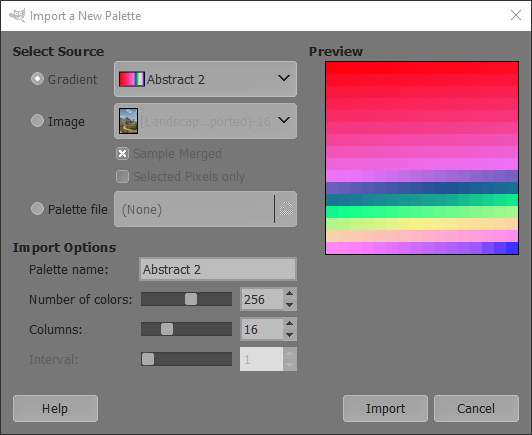
2/ The above window will appear. Select the Gradient radial button.

3/ From the drop down list, select a gradient to use.

4/ The colours for the palette will be displayed in the preview window.

5/ The default number of colours for a palette is 256, but this can be edited with the Number of colors slider, (the total number of colours a palette can have in Gimp is around 10,000). The number of colours above has been changed to 35.
The default number of columns palettes are displayed in is 16, although this too can be edited, this time with the Columns slider.
When you're ready click Import.

6/ The new palette will be visible, top right.

7/ The image above shows the palette with the Palette Editor tab active. In the space provided the name of the palette can be changed. Here its been changed to Gradient Palette Example.
Creating A Colour Palette From An Image Using The Colour Picker Tool

1/ With an image loaded in Gimp, select the Palette tab, then right click anywhere in the list of palettes. From the drop down list select New Palette.

2/ A blank space will appear where the new palette will soon go.

3/ The palette can be given a name.

4/ Select the Color Picker tool from the Tools panel on the left.
Because there are thousands of colours in this (and most) images the Sample Average option has been selected (highlighted in red). This will average out the colour within the radius of pixels selected. Here a radius of 9 has been used. This step is by no means essential, but it can be a good way of evening out colours and making them easier to select.

5/ Under the Color Picker tool options Use Info Window has also been selected. With the left mouse button held down, this window will show the colour under the cursor as it moves around the image. Information about each colour will also be displayed, such as RGB colour percentages, the hex value and its X,Y coordinates.

6/ release the left mouse button and the selected colour will be added as the foreground colour, highlighted in red, above.

7/ Click the icon highlighted above to add the new foreground colour to the palette.

8/ Use the color Picker tool to select the next colour for the new palette. Add the colour to the palette by repeating step 7. Repeat this process until you have all the colours you need for the new palette.
Importing A Palette From An Image

1/ Although a standard image could be used for this method, the resulting palette would be made up of thousands of colours, so a work around is to change the image to a GIF which will limit the colours to 256.
The first step is to select Image > precision > 8 bit integer, so the image exports correctly as a GIF.

2/ Export the image as a GIF.

3/ Load the GIF version of the image back into Gimp. With the Palette tab active right click anywhere in the list of palettes. From the drop down menu select Import Palette.

4/ The above window will open. Select the Image radial button and the preview area will show as many colours of the palette as will fit.
As you can see, the Number of colors slider is greyed out and can't be used. This is because a GIF image was used for the palette. If the inability to edit the number of colours is a problem the next method offers a better alternative.
When you're ready, hit the Import button.

5/ The palette can now be seen under the palettes tab.

6/ Under the Palette Editor tab the full range of colours in the palette can be seen, The palette can be renamed in the space provided.
Creating a Colour Palette From An Image

1/ As with the previous method of creating a palette from an image, the first step is selecting Image > Precision > 8 bit integer.

2/ Now select Image > Mode > Indexed.

3/ The above window will open. Select Generate optimum palette.

4/ As you could see in step 3 the maximum number of colours for this palette is 256. However, in this instance we don't need that many so this has been changed to 25. Here we can edit the number of colours for the palette, which we couldn't do when we turned the image into a GIF.
When you're ready hit the Convert button.

6/ The new palette can now be seen under the Palettes tab.

7/ Although we can see the palette under the Palettes tab, if we were to close down Gimp the palette would be lost. To make sure the palette is saved click on it, then hit the duplicate icon, highlighted in green.

8/ Under the Palette Editor we can see the palette.
When a palette is visible in the Palette Editor, it is the active palette, and if any palette color is clicked on, it will become the active foreground colour, seen to the left of Gimp.

9/ The new palette can also be renamed in the space highlighted in red.
Importing a Palette File Into Gimp
As with many graphics software Gimp has its own native palettes file format. These palette files can be imported into, and exported out of Gimp.
In part two of this series on colour palettes we exported a palette file from Cyotek, and now we're going to import it into Gimp. If you'd like to see how this works for yourself, the colour palette file can be downloaded here. The file is stored on Google Drive so you can be sure its a safe download.

1/ With the Pallete tab active, right click anywhere within the list of palettes. From the drop down list select Import Palette.

2/ In the window that opens select the Palette file radial button. Click the icon highlighted in green.

3/ Using the window that opens, navigate to where the palette file is stored on your PC. Select it then hit the Open button.

4/ Now hit the Import button.

5/ The palette will now be added to the Palettes tab.

6/ The palette will also be visible in the Palette Editor tab, where it can be renamed etc, although its ready to use as it is.
Now that we've covered a lot of ground with calour palettes it should be much easier to generate a range of colours for a project. Colour seems an easy subject, until you start thinking about it, so hopefully this series of tutorials will take some of the guess work and stress out of using colour.