Showing posts with label Second Life. Show all posts
Lusus

How To Use The Free Rooms Templates

 
A scene in Second Life of a man in the foreground, standing on a tilted floor. Another room in the background is at a normal position.

As part of the celebrations for Second Life's 19th birthday, exhibitors were able to offer gifts to visitors, and whilst I had some windchimes to give away, I wasn't able to complete in time the gift I originally intended to offer. Not to be deterred, the gift of a copy of the build that formed my exhibit is now available.

To be clear, what is available is the build of the rooms themselves, rather than the content. I've called them templates because they are effectively blank canvases for anyone to use to create their own unique builds, as well as their own unique 360 degree imagery. 
 
Grab your Free copy of the Rooms Templates from the Marketplace here.

What Are The Rooms Templates? 

 
A Large black cube in the sky containing the rooms.

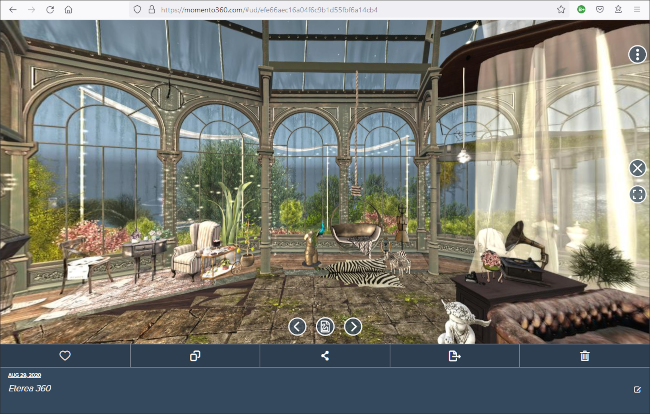
'Rooms' is a project I've been working on for a while, and consists of three rooms contained inside a black cube. Each room interlocks with the next with the intention of making the viewer/visitor question the space they're in, and by extention the nature of 3D virtual space. This 360 panorama is the end result.

A view of one of the rooms. At an uturned angle a figure can be seen from above in another room, some distance away.

The starting point for the project was to create something that would make 360 degree panoramas in Second Life that had an unexpected feel. The possibility that the rooms might be an interesting place to visit and interect with developed from this.

The dining room with table laid out with a meal in the foreground.

From that point it also occured to me that since everyone's imagination works in different ways then everyone would construct something different using these rooms. For instance, take a look at this 360 panorama and how it uses space in a similar way, but looks very different. The idea therefore came to be to offer the rooms as templates for people to develop in any direction their creativity took them, in the hope they would create their own amazing 360 degree panoramas, and possibly allow others to visit their builds in Second Life.

To find out more about Rooms at SL19B, take a look this blog post.

What Is Included With The Rooms Templates?


When you recieve this item from the Second Life Marketplace it will contain:
  • Land Footprint
  • Rooms Template Rezzer. This is the red box with an arrow on top. This will rez the rooms with windows and views outside of them.
  • Rooms Template Rezzer No Windows. This is the orange box with an arrow on top. This will rez a version of the rooms that has no windows.
  • Rooms Buttons a. These buttons control the views outside the middle room.
  • Rooms Buttons b. These buttons control the views outside the lower room.
  • Rooms Buttons c. These buttons control the views outside the upper room.
The idea of having two versions of the room templates is to add more options for what can be created with them.

Both versions of the rooms are big. The version with windows has a footprint of about 30m x 24m, (and a prim count of 43), whilst the other is around 24m x 23m (with a prim count of 27). Because of this large size, and to help with placement on a parcel, a footprint object has been included, as can be seen above. The purple area shows the footprint of the smaller template, whilst both the purple and green areas together show the footprint of the template with windows.

As well as being important in positioning the rooms in relation to a land parcel, the footprint object is also used to accurately rez the rooms at height, as we'll see in a moment.

Rez Boxes

 
The footprint object includes a red square with an arrow, and an orange square with an arrow.

 
Place the red rezzer box on top of the red square so both arrows are aligned. Now the rooms with windows will rez exactly where the footprint is.

 
Placing the orange rezzer box over the orange square of the footprint and making sure both arrows are aligned will ensure the rooms without windows will rez precisely over the purple area of the footprint.

Using The Rezz Boxes


Although the rooms can be rezzed on the ground, they are intended as skyboxes. To rez one of the rooms templates, follow these simple steps.

1/ Rez the footprint object on the ground and place it where you want the rooms to be placed. Get close to the grey box and sit on it.


2/ Right click on the footprint object  and from the menu click Edit, so the Edit Window opens. Make the Object tab the active tab.

The area highlighted in red in the Edit Window is what we're interested in. We'll use it to edit the Z position of the footprint object. (For those that may not know Z is the up/down co-ordinate in virtual space, so we're about to change the height of the footprint object).


3/ Enter how high you want the rooms template to be from the ground. Here 1000 was added. When you're ready hit Enter on the keyboard, and the footprint object will be repositioned 1000m in the sky.
 
Because you sat on part of the footprint object you'll also be transported to 1000m in the sky.

Once the footprint object is in the sky you can stand up.


4/ Position one of the rez boxes over the corresponding coloured square on the footprint. Then left click on the rez box.


5/ This window will appear. To rez the rooms hit the Rezz button.


6/ The rooms are now rezzed. As you can see there aren't any textures on the walls or ceilings of the rooms (although there are floor textures). This is so you can start with the blank canvas that was mentioned earlier.
 
Its also important to note that you'll be standing in one of the rooms after they have rezzed. This is because there is no way in or out of the build, so being inside after rezzing means you can set a landmark and easily access the rooms.


7/ Left click the rez box again and this menu will appear. if you're happy with the position of the rooms, hit the Freeze button to remove the rez script from the rooms. 

If you want to remove the rooms, hit the Remove button.


8/ The rooms template is now rezzed, so you can delete the rez box as well as the footprint object. Remember to landmark a position within the rooms template so you can access it again.

Using the Window Buttons

 
The final items included with the room templates are the window buttons. There is a set for each room. The red button allows you to select the scene, and the blue button enables it to scroll.

Each set of buttons has a slightly different name. 'Rooms Buttons a' should be rezzed in the room you'll be standing in after removing the footprint and rez box. 'Rooms Buttons b' belongs in the lower room, and 'Rooms Buttons c' belongs in the upper room.

Unfortunately I could not include the scripts for the buttons and scenes with mod permissions because they're commerical scripts that I didn't create. If you'd like to use your own scenes, simply delete the scripts in the buttons and the scene viewer and add your own. I'll try to find a better option asap.

You're now ready to start using these rooms templates for your own creations. If you'd also like to use them to create 360 degree images, then these tutorials will be very useful. I should add that stitching images of the rooms into 360 panoramas can be tricky. Sometimes it works first time, other times there can be a lot of trial and error to get it right. The tutorials mentioned above suggest using a setting of between 60 - 90 for the HFOV in Hugin. In the case of the 360 panorama created from these rooms, 85 was used. In other panoramas, 100 was a good setting.
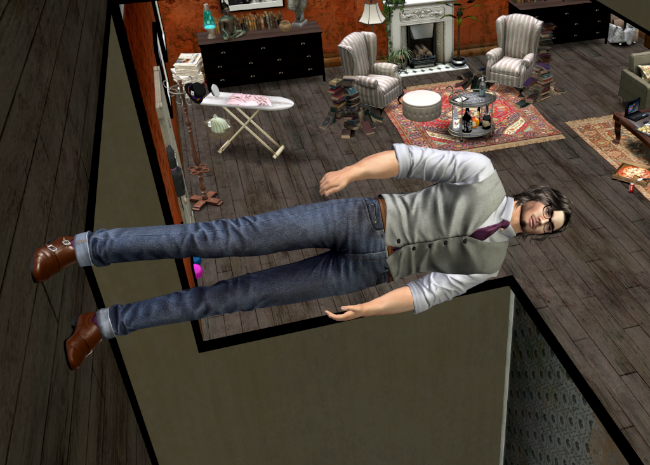
Wall Walker 

 
Once you've created your build using these templates, try exploring it with a wall walker. The above video is a little rough around the edges, but gives an idea of how the wall walker works.
 
There are a number of versions of wall walkers on the Marketplace, but they're all based on the original, which is open source. Therefore decide for yourself whether you want to pay for one or grab the freebie. 
 
The original wall walker comes with some unappealling walk, stand and run animations, but its easy to replace them with your own.
 
If you haven't seen a 360 degree panorama created using these rooms, take a look here, and then see what you can do with your new templates.

Read More
Lusus

Create a Desktop Wallpaper using A 360 Degree Panoramic Second Life Image


In previous SL-Inspiration tutorials we've covered how to use Second Life images to create desktop wallpapers, both as a gallery of images and an animated wallpaper. Another subject we've covered in depth is how to create 360 degree panoramic images in Second Life, the hud you'll need to buy from the Marketplace, and the choice of software needed to stitch the images together. In this tutorial these two elements are brought together to create a desktop wallpaper using a 360 degree panoramic image created in Second Life.
 
The image below is an example of a 360 degree image that can be used as a desktop wallpaper. It shows an interior from the very photogeneic location called Eterea, which sadly appears to no longer exist. 
 
To fully view the image Drag it with your cursor, and click the square icon to the right of the image to view fullscreen.


As already indicated, there are a few things you'll need to create a 360 degree wallpaper, such as having a working knowledge of the tutorials mentioned above. You'll also need to sign up for, and install Steam, and then grab a copy of Wallpaper Engine, which runs on that platform. Although Wallpaper Engine isn't free, the cost is very low (around £3.00, or about $4.00), which is easily affordable, and worth every penny.

The last thing you'll need is a 360 degree panorama uploaded to a platform such as Momento360. This platform is used here mainly because its easy to use, doesn't have an intrusive watermark, and not least because its free.

Creating the Desktop Wallpaper using A 360 Degree Panoramic Image 

Creating the 360 degree wallpaper is very simple. Wallpaper Engine essentially embeds the panorama from a website and displays it as a wallpaper. Following from this, the first steps are to get a link for the panorama and create an embed code.


1/ Go to the Momento360 page (or similar site) that displays the panorama. If you don't have one yet the one here can be used


2/ Click on the connected three dots icon shown above and the drop down menu will appear. Click on Share or embed a link.


3/ This window will now appear. Click the Copy button to copy the link.

Shortening The Link


This step isn't entirely necassary but Memento360 tends to produce cumbersome links, so using a link shortener makes them easier to work with. Here TinyUrl is used, but you can use whichever link shortener you prefer.

1/ Paste the link copied from Momento360 in the space provided, then hit the Make TinyURL button.


2/ In the next window that appears hit the Copy button. You now have the shortened Url.

Creating The Embed Code

To anyone who knows a little about HTML markup this is a very simple step. For those that are less sure what to do, follow these easy steps.
 
 <iframe src="[URL OF 360 DEGREE PANORAMA]" style="border: 0px none marginheight="0" marginwidth="0" allowfullscreen="" frameborder="0" height="1080" scrolling="no" width="1920"></iframe>
1/ Open Wordpad or a similar app. Copy the above markup and paste it.
 

2/  Replace [URL OF 360 DEGREE PANORAMA] including brackets, with the shortened link we just created. The width and height settings can be changed to the resolution of your screen, although the wallpaper should display well as it is.


3/ In Wordpad select File > Save As. Name the file and give it a html extension, as shown above. Hit Save.
 

4/ Open the folder where you saved the file, and it should look something like above, probably displaying the logo of your default web browser.


5/ Double click on the file and the 360 degree panorama should open in your browser. 

We're now ready to create the wallpaper. 

If you don't have Wallpaper Engine yet, now would be a good time to get it.

Creating The 360 degree panoramic Wallpaper With Wallpaper Engine

1/ If there is a Wallpaper Engine icon on your desktop, double click it to start the app. Otherwise open Steam, then open Wallpaper Engine. Steam can be closed once Wallpaper Engine is running.


2/ When Wallpaper Engine has opened, its icon will probably be hidden on the taskbar. Click the up arrow icon (highlighted in red, above) to the bottom right of the taskbar, then click on the Wallpaper Engine icon.

From the drop down menu select Create Wallpaper.


3/ This window will appear. Open the folder containing the html file created in Wordpad. Drag the file onto the blue Create Wallpaper rectangle.
 
Wallpaper Engine has a quirk that means if there are any other files in the same folder as the html file, all the files will be added to the wallpaper. As we don't want this, it is best to put the html file in a folder by itself before dragging it.


4/ This window will appear. The wallpaper can now be given a name. When you're ready click OK.


5/ This window will now show the 360 degree panorama. 
 
Sometimes Wallpaper Engine will pause at this point. If this happens close the window. Then look at the Wallpaper Engine menu (the one we opened earlier), and under Recent Wallpapers, see if your wallpaper is listed. 
 
Alternatively, select  Browse Workshop, then in the window that opens select Installed. If your wallpaper is listed (no doubt without a thumbnail), then its been created. 

Unfortunately if the wallpaper can't be found you'll have to create the wallpaper again.


6/ Now select File > Save. The preview window will go blank when using the menu options. Its nothing to be concerned about. Now close this window.


7/ If the desktop isn't displaying the 360 degree wallpaper, click on the Wallpaper Engine icon in the taskbar, and from the drop down menu select Recent Wallpaper. Click on the name of the wallpaper you just created from the list it displays.

The wallpaper can now be dragged and viewed just like any 360 degree panorama.


8/ If the 360 panorama has been embedded from Memento360, there will probably be scrollbars visible. Click the icon to the right of the screen (highlighted in red, above), and these scrollbars will disappear.

Wallpaper Engine Settings

1/ To change the settings of the wallpaper, from the Wallpaper Engine drop down menu select Settings.


2/
In the window that opens, settings such as FPS and Post-processing can be tweaked.


3/ If your PC is high end then changing Post-processing to Ultra will really make the wallpaper pop. 
 
When you're ready, hit OK.

Sharing The 360 Degree Panoramic Wallpaper

Wallpaper Engine has a slightly perplexing system for sharing wallpapers, and even when the steps for sharing are followed, the wallpapers don't always seem to show in the Workshop.

However, there are ways around this. Shared wallpapers are given a page on the creator's Steam Workshop, where subscribers can download the content, (presumably in this instance this would be the wallpaper file). For anyone interested here are the 360 degree panoramas I've created using Wallpaper Engine.

Another option is to simply share the html files created in Wordpad and let friends create their own wallpapers with them. With this in mind, I've zipped three html files ready to be used as wallpapers. (Please keep in mind however, that these html files or wallpapers must not be sold or included in any package without my prior consent, and they must not be passed off as your own work. They can be shared with others, but it must be made clear that SL-Inspiration is the original creator).
 

Adding Wallpapers to The Workshop 

As already indicated, the Wallpaper Engine Workshop is where wallpapers are freely shared. They also appear on individuals' Workshop space. If you're feeling generous and community minded, the following steps will show how to add your own wallpapers to the Workshop.


1/ Click on the Wallpaper Engine icon in the taskbar, and from the drop down menu select Browse Workshop


2/ This window will appear. Click on Installed, then select the wallpaper you've created. To the right, click on Open in Editor.


3/ Sometimes at this stage, Wallpaper Engine will stall, but don't let it alarm you. Just close the windows and repeat the steps above.


4/ From the top menu select Workshop > Share Wallpaper on Workshop.


5/ Information about the wallpaper will need to be added in the window that opens. A thumbnail image will also need to be uploaded.
 

6/ When you're ready hit Publish.


7/ This window will appear showing a progress bar. When the wallpaper is published, it can be viewed in the Workshop.


And here is the wallpaper appearing in my Workshop, with options to the lower right for further editing.

There may seem a lot of steps here for something that could be considered a little niche, but having a working 360 degree panorama as a desktop wallpaper is quite impressive. If you have a 360 degree panorama, give it a try, or alternatively use one of the files available on this page.
Read More
Lusus

Displaying Second Life Desktop Wallpapers With The Free Awsome Wallpaper App


In a number of previous tutorials we've shown how to use images created in Second Life as desktop wallpapers. Probably the most versatile app mentioned was Wallpaper Engine which, although very versatile some may not like due to its small price tag. 
 
Ignoring the issue of the paltry cost of Wallpaper Engine, possibly the most off putting thing for potential users is the need to be signed up to, and have Steam installed before the app can be opened. (Steam is excellent and I recommend installing it, but it can be a little inconvenient if all you want to do is create wallpapers from Second Life images). 
 
For these reasons an easier alternative for displaying Second Life desktop wallpapers is Awesome Wallpaper, which is free to download and use.

Creating Desktop Wallpapers With Awesome Wallpaper

Awesome Wallpaper can display a number of different kinds of desktop wallpapers, but the two we'll focus on here are wallpapers consisting of a gallery of images and animated desktop wallpapers. The process for creating both is very similar.
 

 1/ download the Awesome Wallpaper app from the website, (the link is above).


2/ Unzip the downloaded file. 


3/ To run Awesome Wallpaper, open the unzipped folder and double click on the icon highlighted above.

 
 4/ Right click on the ^ icon to the right of the computer's Taskbar, then right click on the Awesome Wallpaper icon. The menu above will appear. Click on Settings.
 

5/ This window will now appear. There is a tab for each type of desktop wallpaper, as well as a General tab. 


6/ To create a gallery wallpaper (i.e, a slideshow) you'll first need a folder containing all the images you want to use. Click the Gallery tab.


7/ To navigate to the folder containing the images, click the grey button to the right of 'Folder with images'. Select the folder and click OK in the navigation pane.


8/ Enter a number in the 'Interval between images' box for the time delay between images. Here 0 has been added so one image will immediatelly follow another.

In the 'Show image (sec)' box enter the length of time each image will be displayed. Here 180 seconds (or three minutes) has been entered.

When you're ready hit OK.


9/ Select the General tab again.


10/ From the Wallpaper Type drop down list select Gallery. Now hit OK. The images in the selected folder will now display in turn on your desktop.

Creating An Animated Desktop Wallpaper With Awesome Wallpaper

Creating an animated desktop wallpaper is very similar to creating a gallery, except instead of using a collection of images an MP4 file is used.
 

 1/ Select the Video tab, then navigate to where the MP4 is located. Select it then hit OK.
 

 2/ Select the General tab, and from the Wallpaper Type drop down list select Video. Now hit OK. The video will now be your animated desktop wallpaper.
 
 
We hope you enjoy not only using the wallpapers available here, but also feel inspired to create your own. There is so much originality and creativity in Second Life that we're sure many residents will generate some unique ideas for desktop wallpapers.
Read More