Retro Gaming Scripts For Gimp
By
01:18:00

The retro gaming scripts for Gimp manipulate images to give them, naturally enough, a retro gaming look. Or to describe them from another perspective, these scripts add different styles of dithering to your images.
Altogether there are eleven different scripts, and each one imitates the style of various retro computers. For instance, there are three scripts dedicated to retro Amstrad graphics, four to the old BBC computers, and others that adopt the graphic styles of the ZX Spectrum, Commodore, as well as a few others.
The reason I have decided to provide a download for these scripts is because, since the Gimp Repository closed, finding scripts has become in many cases very difficult. It doesn't help that most bloggers/article writers just post about the same old scripts, leaving out the less well known ones no matter how good they may be. This makes finding a diversity of scripts all but impossible.
Also, I have used these retro gaming scripts in the past and found they can be a goood method for transforming images from the ordinary. As such these scripts deserve to be made more widely available, so now they can be downloaded for free from my Ko-Fi store.
I should make it clear I did not make these scripts and would be happy to credit the original creator if they came forward, or if anyone knows who they are. The scripts are however, in the open source spirit of Gimp free to download, distribute and use, so no intellectual property infringement has been commited.

How to Install The retro Gaming Scripts In Gimp
It can be quite common for people to be unsure how to install scripts in Gimp, but just follow these few steps.
1/ Open where the scripts are located on the hard drive.
2/ Select the first script and hold down Shift. Now select the last script, which should result in all of them being selected.
3/ Right click and from the drop down menu select Copy.
4/ For the next step you'll need to make hidden items visible. To do this, open Windows Explorer, (the yellow folder icon usually available on the Taskbar).

Under the View tab click Hidden Items to the furthest right, so there is a tick in the box.
5/ There are a lot of folders to click on in this step. First in Windows Explorer click on Local Disk (C:) so you can see all of its contents in the main panel. Now double click on the following folders in turn to navigate to where to paste the scripts:
Users > [active user account name*] > App Data > Roaming > Gimp > 2.10 > Scripts.
Paste the Gimp scripts in the Scripts folder.
*the 'active user account name' will be the name of the folder for your Windows account. It could be your name or simply just User.

6/ Start up Gimp, and under the Filters menu there will now be a section named Retro Computing listing all of the installed scripts.
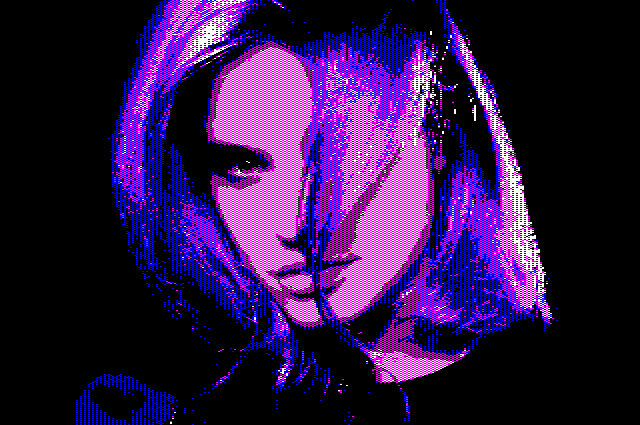
Below are a few images created using the retro gaming scripts.


The last two images were created a number of years ago, using a legacy Second Life avatar.
The animated gif was created by making a short video of a rotating avatar head in Second Life, grabbing each frame using GAP in Gimp, (this is the best download I can find), then applying the same retro gaming script to each image. They were then all compiled into an animated gif.
How To Use The Retro Gaming Scripts

There really isn't a correct way to use these scripts since they encourage experimentation to arrive at images you'll like. However, here is a quick run through of how I created the above image.

1/ Open the image in Gimp. Depending on the image used, it will probably need to be cropped and scaled since the retro gaming scripts work best with smaller files.

2/ The scripts also work best with the colours of the image reduced. To do this select Image > Mode > Indexed.

3/ In the window that opens enter the number of colours you want to use. Here 15 has been added. Now hit Convert.

4/ The image will now look like the above. To be able to use the scripts we now need to convert the image back to RGB. To do that select Image > Mode > RGB.

5/ In the window that opens just hit Convert.

6/ The image is now ready to use, although if you want you could adjust the colour saturation and play with the Curves option, both found under the Colors menu.

7/ To open a script, select Filters > Retro Computing, and from the drop down menu choose the one you want to use. Here BBC Micro (Mode2) has been selected.

8/ The script window opens. Most of the retro computing scripts have a number of options, each with a different retro look generated from each script. (It may be useful to know that the BBC Micro (Mode 4) script generates monochrome images).
Once an option has been selected hit OK.

9/ The script will take a short while to work, and then you'll have your dithered, retro gaming image.


