Its always been my experience that raw snapshots taken in Second Life are not as focused as they could be. They tend to be slightly undefined. Taking snapshots with the Black Dragon viewer makes a difference, but can be very impactful on PC resources. Whichever viewer you use, knowing how to sharpen a Second Life photograph is essential, as its one of those select tools that can help make your images pop.
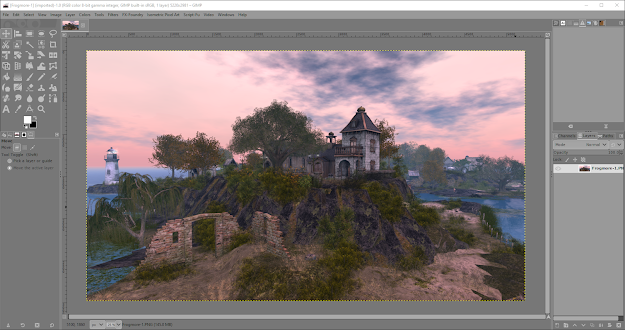
The image used for this tutorial was taken at Frogmore, a very picturesque sim where all Second Life photographers will find something to inspire them. The destination guide describes it very well:
Frogmore is a natural, photogenic, and fully immersive experience
inspired by historic Cornwall, England, bordered by the Celtic Sea and
the English Channel. Frogmore is rated Moderate and open to the public;
please join the free group for rezz rights and enjoy the lavish
experience of the Cornish Riviera.
Sharpening A Second Life photgraph With The High Pass Filter In Gimp
There are a number of ways to sharpen a Second Life Photograph in Gimp (some of which will be covered in later tutorials), but this technique works well and is quick and easy.
1/ Open the image in Gimp.
2/ Click on the icon to the bottom right of Gimp (highlighted in red above), to duplicate the image.
3/ The two image layers can be seen to the right.
4/ This step isn't strictly necessary, but it will stop the high pass filter from highlighting colours. With the top layer active, select Colors > Desaturate > Desaturate.
This image is here so it will be the thumbnail on the homepage. Blogger is rubbish.
5/ This window will open. The Mode drop down menu offers different desaturation types. Here Lightness (HSL) has been selected.
6/ The desaturated image will look something like the above.
7/ With the desaturated image still the active layer, select Filters > Enhance > High Pass...
8/ The top layer will look something like the above, and the High Pass window will be open.
9/ Set a value for the Dev option. Here 15 has been selected. A little intuition is needed here because a few things will affect how much or how little high pass to use. Image size is one factor that may influence this.
10/ The level of detail shown in this high pass layer looks about right.
11/ Click on the Mode drop down button to the right, highlighted above in red.
12/ From the drop down list select a blend mode. The section beginning with Overlay and ending with Hard Mix are the blends that work well with the high pass filter.
13/ Here, hard light is the blend thats been selected.
14/ Your image should now be much sharper, although it can be tweaked a little more. If you want to sharpen the image even further the high pass filter layer can be duplicated, the blend mode can be changed, and the opacity adjusted.
To see the difference the high pass filter can make, below is the before and after. Click to enlarge if you need to.
Before....
After.
The effect may not be too dramatic here, but this is a very flexible method for sharpening images, and you're free to play around and experiment.
We hope you've found this tutorial useful. If so bookmark, like us on Facebook, and generally subscribe.
One of the Second Life features that can really make an image stand out is the Environment settings. A technique I often use is to adjust the haze sliders so the sky and land or sea blend together, thereby avoiding the harsh horizon line that is sometimes too evident in Second Life pictures.
The haze effect however often affects the entire image including the foreground. If this is the effect Second Life photographers are looking for thats fine, but if not there is a way around this. This tutorial will show three methods of removing the haze from a Second Life image using Gimp.
The original image used for this Gimp tutorial was taken at Clockwork Bird. Take a few moments to visit this brilliantly constructed location.
If you're looking for methods to remove haze from real world photographs then these methods will work just as well.
2/ Select Colors > Levels (highlighted in red, above).
3/ The above window will open. The Input Levels has three trianglular handles that can be moved to adjust this setting. For this tutorial we're interested in the two outer handles.
4/ Grab and drag one handle with your cursor by holding down the left mouse button. Adjust the handles using the above image as an example, until you're happy with your image.
5/ The haze should now be markedly reduced in the foreground of the image.
6/ Your image is now ready for further editing, or exporting.
Method Two: Levels II
1/ With the image opened in Gimp, make a duplicate layer by clicking the icon highlighted lower right. Make sure the top layer is active.
Now select Colors > Levels again.
2/ This time we're going to drag the right handle on the Output Levels towards the middle of the Levels window
3/ Adjusting the slider will make the image cloudy, as above. The amount of cloudiness will differ from image to image so a little trial and error will be involved.
4/ From the Mode drop down menu select Soft Light.
5/ The haze should now have cleared from the foreground, although the image as a whole may look a little blown out.
6/ To compensate for this, adjust the opacity of the top layer until you're happy with the image.
7/ The layers can now be merged, and the image exported from Gimp.
Method Three: Curves
1/ This method is very similar to method two, except this time we'll be using the Curves selection.
Start by duplicating the image so there are two copies in the Layers panel. Make sure the top layer is the active layer. Now select Colors > Curves.
2/ This window will open. The Curves window lets any part of the line be dragged to form a curve. For this tutorial however we're just going to adjust the top of the line, highlighted in red.
3/ Grab the top node with the cursor and drag it into a similar position to the image above. How much you move this node will depend on your image. You're aiming to get a cloudy appearance, as in method two.
4/ The top layer should look something like above. In the Mode drop down window select Soft Light.
5/ The opacity of the top layer will probably need adjusting.
6/ When you're ready merge both layers and export.
Below is the original image to compare the results with.
As you can see, removing haze from a Second Life image is quick and easy. All three methods here produce similar results, although perhaps two and three need more trial and error than the first. I particularly like the foreground contrasted with the background receding into haze these methods produce.
In recent tutorials we covered how to create desktop wallpapers using Second Life images, so the natural progression from that is creating screen savers. In this tutorial we'll be focusing on panoramic images that scroll seamlessly and continuously across the screen when your PC is idle, using a lightweight and free programme called WPanorama.
Creating a Panoramic Image In Second Life
In a previous two part tutorial we explained how to create 360 degree panoramic images in Second Life, which you'll need to be familiar with to create these images, as well have a 360 degree panoramic hud for taking the photos in Second Life. (Edited to add that 360 degree panoramas can now be taken using the Second Life viewer without the need of a hud).
The tutorial linked to above covers both Hugin and Microsoft's Image Composite Editor (ICE), but for this tutorial we'll just be using ICE, because its quicker, simpler and easier to use.
There are a few differences in creating panoramic images to use as screen savers, than creating full 360 panoramas, but they are minor, and explained below.
1/ Since we're not creating a full 360 degree panorama, but one that seamlessly rotates horizontally (ie, a 360 degree cylindrical panorama), we don't need to add to ICE the last two images taken with the hud in Second Life. These are the images taken one directly above the camera position, and the one directly below.
2/ Once the images have been stitched together in ICE, hit the Crop button. We need to crop out the irregular horizontal edges of the image, so grab and drag the nodes highlighted in red above.
3/ Now hit the Auto Complete button so your image looks something like the above.
WPanorama's performance isn't affected by the height of the image, so it doesn't matter if your finished panorama is skinny or fat, although you'll need to keep your screen's resolution in mind. If for example, the resolution is 1920 X 1080, a panoramic image with a height of 720 is not going to look good.
Another tip to keep in mind is that things too close to the camera can become distorted, so they may need to be cropped out.
With these points taken into consideration the image can be exported from ICE in the usual way, ready to use in WPanorama. There is no need to edit the Exif metadata as you would with a full 360 degree panorama.
WPanorama
WPanorama is freeware and can be used for both viewing panoramic images on the desktop, and for displaying scrolling panoramas as screensavers. The scrolling movement will automatically loop seamlessly.
If however the image is not a seamless panorama it will scroll in one direction until it reaches the edge of the image, before scrolling in the opposite direction. You can download WPanorama here.
1/ When WPanorama first starts it will display a pre-installed panoramic photo. In fact the app comes with a large selection of images that are stored in a Windows Documents folder. If you don't want to keep these images, simply go to the folder and delete them.
2/ After the images have been deleted WPanorama will look like the above.
3/ To just view an image rather than using WPanorama as a screen saver, select File > Load image, then navigate to where the image is stored.
4/ WPanorama will now display the panorama, which should be scrolling.
Creating A Screen Saver
1/ To Create a screensaver, select Screen saver > Configure screen saver.
2/ In the window that appears hit the Select button.
3/ Now Navigate to the folder containing your panoramas. A screen saver can contain more than one panoramic image and will display each image in turn. To add more than one image click on the first, hold down Shift then select as many images you want. Now hit Open.
4/ Once the images have been loaded this window will appear. More images can be added by hitting the Add images button. All the images can be deleted by hitting the Clear list botton.
5/ The image list can now be saved, and will be stored in the same folder as the panoramic images we deleted earlier. WPanorama can contain many image lists, and each can be loaded as a screen saver.
To create a list, hit the Save list button.
6/ Name the list, here named SL Panoramas, then hit Save.
7/ The above image shows the files created when the list was saved.
The process of adding images to WPanorama and saving them as lists can be repeated, so you can have as many image lists as you want.
WPanorama can switch from list to list by hitting the Load lists button, navigating to the folder containing the lists, then selecting the relevant list.
If you're only using one or two images, there's no need to save them as a list. Once the images are loaded into WPanorama, just hit the tick icon, lower right (shown above).
8/ The images have now been loaded into WPanorama and are ready to use. However, if there is more than one image make sure the Auto image change box is ticked, and then select the duration each image will be displayed.
When you're ready hit Apply then OK.
Previewing The Screen Saver
9/ One point should be noted here. The panorama shown in the WPanorama display window will not be one of the images added to the screen saver. It will be the image added when hitting File > Load Image.
To preview the screen saver hit Screen saver > Preview screen saver. Mouse movement will close the preview.
Another way to preview the images, and make sure WPanorama is the selected screen saver is the following.
10/ Click the Windows icon to the far left of the taskbar, then hit the cog icon to view Settings.
11/ The above window will open. Select Personalisation.
12/ The window above will now appear. Select Lock screen.
13/ This window will now appear. There is a scroll bar thats a little difficult to see to the right of this window. Scroll it until you see Screen saver settings, then click on it.
14/ This window will now appear. Under the Screen saver drop down list select WPanorama if it isn't already selected, then hit Preview. The panoramic screen saver should now be full screen. Moving the mouse will close it. Click OK when you're ready.
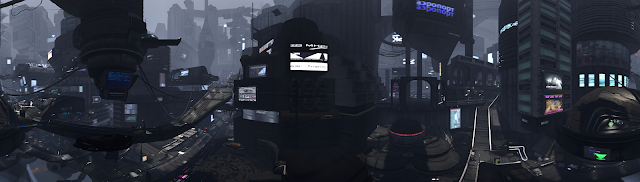
...and this image was created at D-Lab.A full 360 panorama of this image can also be seen on Momento 360. Click the icon centre right on the Momento page to view these panoramas full screen.
To get you started with panoramic screen savers created in Second Life we have two images for you to download and add to WPanorama. We'll be creating more too so bookmark us and follow us on Facebook. The images are quite large, but can be rescaled to fit your screen if needed. They're stored on Google Drive so will be pre-screened so you can be sure you'll get a clean download. To grab the panoramas click here.
Click this icon which will be shown top right of the dowload page to get the panoramas.
Watch the short videos above to get an idea of what the scrolling
panoramas will look like on your desktop. We hope you'll feel
inspired to make your own panoramas and it would be great to see them shared on social media.