Lusus

How to Use the Bitmap Trace Tool In Inkscape


In an earlier tutorial we showed how to create custom gradients in Gimp and use them to decorate butterfly wings. This tutorial follows on from that by showing how to take a photo of a butterfly then use the bitmap trace tool in Inkscape to turn the wing into an SVG graphic. As anyone who has used Inkscape before will know, the advantage of this is that the SVG graphic can be exported at any chosen size without losing image quality.

As well as showing how to use the trace bitmap tool in Inkscape, this tutorial will first prepare the photo in Gimp, then once the bitmap has been traced it will be modified, exported from Inkscape and then tweaked again in Gimp so it is ready to use in other graphics.

This may seem a complex tutorial but each step is very quick and simple and at the end you will have a butterfly image (or in fact any other image) you can use in numerous ways. Click each image to view full size if you need to.

How to Use the Bitmap Trace Tool In Inkscape


1/ This is the image we'll start with, so first of all open it in Gimp.


2/ To make it easier to use the trace bitmap tool in Inkscape we'll make the photo monochrome. It is possible to simply open the photo in Inkscape and apply the trace bitmap tool, but a little manipulation in Gimp to begin with lets us control the quality and appearance of the final result.

Removing a lot of unwanted detail from the image is what we want to do here, so firstly select Colors > Desaturate > Color to Gray.


3/ This is the desaturated image.


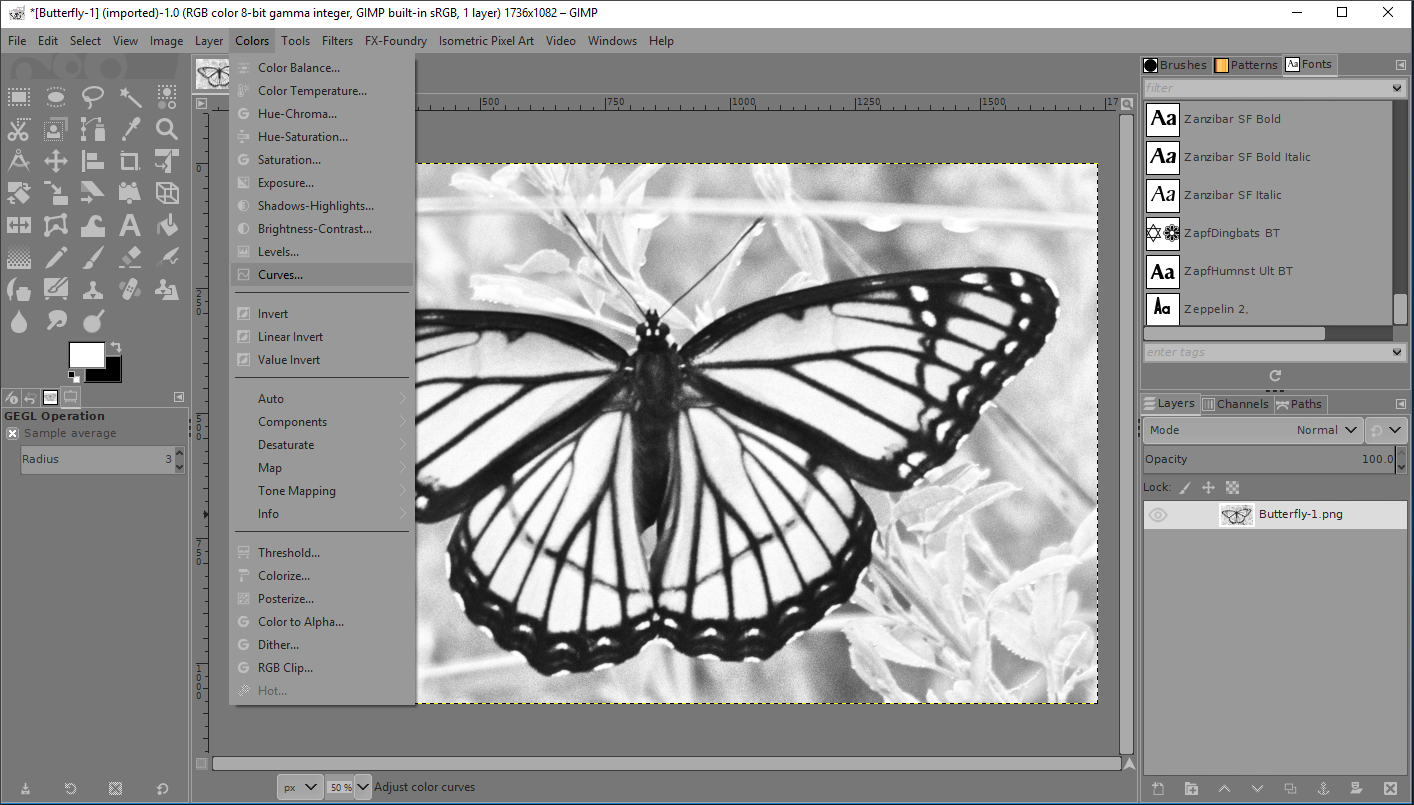
4/ To remove unwanted detail we'll use the Curves tool, so select Colors > Curves.


5/ The above window will open. Grab a point on the diagonal line to lighten or darken sections of the image. The extent this needs to be done will be different for every image, but the above image shows the settings used here.


6/ This is how the image was changed and is very close to what we want. There are still a few grey patches around the butterfly which can be painted out, although they're unlikely to show after the image has been traced in Inkscape.


7/ To create a more symmetrical appearance to the butterfly we just need half of the original image which we can later duplicate, invert it horizontally and then join to the other half.

For this reason whilst both the antennas of the butterfly are weak all we need do here is work on the right antenna.

Using Ctrl and the mouse wheel we have zoomed in on the head of the butterfly so we get a better view.

Create a transparent layer and select the Paths tool from the toolbox. left mouse click at the start of the antenna, click again at any sharp angle, then at the end. If there's a curve in the antenna hit Ctrl and click in the middle of the curve to add a node. Now drag the new node so the path curves to match the antenna.

In the lower half of the Toolbox panel hit the Stroke Path button.


8/ The above window will open. Select the width of the antenna line then hit the Stroke button when ready.


9/ This is the result of hitting the Stroke button.


10/ To create a more natural rounded end to the antenna, on a new transparent layer using the Ellipse tool (2nd from the top left) in the Toolbox, create a small elliptical shape. Fill it with black, then using the Rotate  and Move tools position it at the end of the antenna.

Now merge all the layers. A less destructive way would be to right click on one of the layers and from the drop down list select New from Visible. This will create a new layer consisting of all the visible layers. Your original layers will be intact.


11/ We now need to remove half of the image, so with the Rectangle Select tool (top left) from the Toolbox panel, drag a rectangle around the half we want to keep. Here its the right half. Be precise with the placing of the rectangle. Once positioned the edges of the rectangle can be adjusted by dragging them.


12/ Hit Image > Crop to Selection and the unwanted section of the image will be removed. Now export the image from Gimp, saving it as a PNG file rather than a JPeg.

Tracing The Bitmap In Inkscape


13/ Open the image from Gimp in Inkscape. You'll see a window similar to the above. Make sure the options are the same as here then click OK.


14/ You may need to make the page fit the Inkscape window by hitting 5 on your keyboard.


15/ With the image selected go to Path > Trace Bitmap (Shift > Alt >B).


16/ This panel will now appear to the top right of Inkscape. There are a number of options for tracing bitmaps, but the above settings should work well for this image. The best way to find out what effects the settings will have is to play around with them, remembering that you can always make use of the undo function (Ctrl > Z).

If you don't see a preview of the traced bitmap hit the Update button. When you're ready hit OK.


17/ The traced bitmap will appear directly on top of the original image, so you'll have to move it to see the difference between them both. If you're unhappy with the result, select the original image then tweak the settings in the Trace Bitmap window and hit OK again when you're ready.


18/ When you have a traced bitmap you're happy with the original image can be removed.


19/ There will probably be some missing details from the butterfly wing, so we'll now fix that. The original photo will be used as a guide so import it into Inkscape then move it below the bitmap by hitting Object > Lower (Page Down).

The image may also need to be adjusted to match the size of the bitmap by dragging the arrows at its corners and edges.


20/ To make it easier to distinguish between the bitmap and photo, the opacity of the photo has been lowered using the slider to the right (highlighted in red).

 Using the Bezier Tool


21/ Using the Bezier tool (highlighted in blue to the left) the veins of the wings can be drawn in. click at the start of the line you want to draw, then double click at the end.


22/ To the right of Inkscape there should be the Fill and Stroke panel. If you don't see it, hit Shift > Ctrl > F. Under the Stroke style tab the width of the line created with the bezier tool can be adjusted. The default setting is millimetres so its usually best to change this to pixels (px).

There are also options to choose if the end of a line should be flat or curved.


23/ In the image above a bezier line has been added to part of the wing that has a straight section as well as a curved section. To change direction in a line, click at the position you want the line to begin, which will add a node. Thenclick at the part of the line a new direction is needed.

The easiest way to create a curve within a bezier line is to click at the start of the line, then double click at the end.  Now select the Edit Paths tool (2nd from the top left highlighted in blue), then double click in the middle of where you want a curve. This will add a node to the middle of the line.

The tools highlighted in red in the above image can be applied to an active node. After adding the node to the middle of a line, select one of the node tools then drag the node. The first node tool will create a sharp angle, but the other three create curves with different features.

Once the node has been dragged the line will curve and handles will appear on the node. These handles can be seen in the above image and can be moved to adjust the curve..


24/ This image shows the wing with the veins drawn in.


25/ The background image is no longer needed so it has been removed. We're now going to duplicate this half of the butterfly.


26/ The first thing we need to do is drag the selection tool (first tool, top left, highlighted in blue) to form a box over all the elements of the image. This will select all these elements. Now select Object > Group (Ctrl > G). Now all the different elements of the image will act as one object.

Check all the parts have been selected and grouped by moving the group a little. Any parts that don't move have not been grouped. Select Edit >Undo until the grouped parts are moved back to their original position, then follow the steps to group objects.


27/ With all the parts grouped select Edit > Duplicate (Ctrl >D).


28/ We now have two wings. Use the Selection tool to move one wing to the left, then use the transform tool (highlighted in red in the above image) to flip the wing horizontally.

Export The Image From Inkscape


29/ Move both wing sections together and you have a perfectly symmetrical butterfly. The image still needs a little work however so now we'll export it from Inkscape then open it in Gimp.


30/ First select one half of the butterfly, hold down shift then select the other half. Now select File > Export PNG Image (Shift > Ctrl > E). A panel similar to the right of the above image should be visible.

There are a number of options for exporting an image from Inkscape including exporting the page or the drawing, but in this instance we'll use Selection (highlighted in blue, top right) so that only the bitmap is exported with no background etc.

In the Image size section, add the size you want your image to be.

The area highlighted in red allows you to name and save the image file to a location on your PC. Hit Export As then navigate to the location on your PC, and name the image file.

When you have finished navigating to the location for the file and naming it, the image has still not been exported from Inkscape. This sometimes confuses a few people because you'll need to hit Save in the navigating window, so its easy to think the image has been saved. For the image to actually be exported however, the Export button highlighted in Green should be clicked.

Tweaking The Image In Gimp


31/ This is the image in Gimp. The background of the butterfly is transparent, and the white is a background layer I added to highlight any blemishes.

All we really need to do to the image in Gimp is paint in any gaps we don't want. The area where the two halfs meet is an obvious example since the seam is visible, although there are also areas in the wings to fill in. Finally there are a few black spots that need erasing.


32/ This is the final touched up image ready to be used on other projects.


To use the butterfly image for the tutorial on creating gradients mentioned at the top of this page you'll need to duplicate your butterfly layer then create a silhouette similar to the one above. If it isn't clear why you need this take a quick look at the tutorial by following the link above and all will become apparent.

The techniques covered in this tutorial can clearly be used for much more than creating butterfly based graphics, particularly the bitmap tracing section. Also the fundementals of using the bezier tool will become a mainstay for many budding designers as they become more familiar with Inkscape, and use it do some of the tasks it does better than other software such as Gimp. If you've enjoyed this tutorial feel free to share and to come back for more.
Read More
Lusus

Cafe Calza Jigsaw Puzzle


As many Second Life residents will know, food is a popular subject of conversation, and everyone has at least one favourite recipe they love to share. With this in mind the aim of Cafe Calza is to provide a place where recipes, cooking tips and all kinds of culinary expertise can be collated and shared.

How It Works

The basic idea is simple. Come along to Cafe Calza and click on the chalk board for an info pack. Rez the box then copy the contents to your inventory. Add your recipe to the notecard included in the info pack along with any additional information such as a description. Save the notecard then drag it to the post box. We will then collect your recipe and include it on the Cafe Calza blog so it can be shared. It would be incredibly helpful if the notecard also included an original full permission photo of the prepared recipe.

You can submit as many recipes as you like, so make sure you keep a copy of the original recipe notecard at hand (or rez another from the info pack). Once the recipe has been added to the blog you will of course be credited as the source of the submission.

Keep a bookmark of the Cafe Calza blog because over time it will become a great source for recipe ideas, cooking tips etc all collated via Second Life. There will always be something new for you to discover on the blog, and since Second Life has a global reach there is a great potential for recipes to be added from all over the world.

Cafe Calza is located at The Pulse, a very friendly club with some of the finest DJs in Second Life. Come enjoy the music, the banter and the fun, and share your cooking expertise!

A Note On Teleporting To Cafe Calza

The landmark setting at The Pulse will take you to wherever there is a gig or by default to the beach. If you're not taken directly to Cafe Calza when you arrive, simply hit the landmark again.

About The Cafe Calza Jigsaw Puzzle

You don't need to be a foodie to enjoy solving the Cafe Calza jigsaw puzzle, which you can download and keep here. The puzzle is stored on Google Drive, so you can be sure it doesn't contain anything nasty. Once its downloaded you can play it offline by unzipping the folder then double clicking on the Cafe Calza jigsaw puzzle icon.

If you prefer to solve the jigsaw puzzle online we have an embedded version for you below. Enjoy solving this jigsaw puzzle and come visit us at Cafe Calza and The Pulse in Second Life.

There are lots more jigsaw puzzles here, and if you enjoy them, keep up to date with all we do on our Facebook  page.

Read More
Lusus

How To Create Custom Gradients In Gimp


Creating a custom gradient in Gimp does not need to be a complicated process, and once you have a grasp of the basics each gradient can be used in your own designs. The wings of the butterfly pic here were filled with a custom gradient, and after we show how to create a custom gradient in Gimp, we'll walk you through how the image was put together so you can make your own butterflies if you want to.

Creating A Palette

The first step in creating a custom gradient in Gimp is to create a palette. If you need to, click on each image in this tutorial to enlarge.


1/ With Gimp open go to Windows > Dockable Dialogues > Palettes.


2/ The above window will open. Click on the icon second from the lower left with the green plus arrow to start creating a new palette.


3/ The Palette Editor should now be open, and should look something like the above.


4/ The Palette Editor adds colours from the active foreground colour, so first click on the foreground colour in the Toolbox, and the above Colour Selector window will open.

To select a colour either click within the large window to the left, or the vertical array of colours to the right of it. The sliders to the right can be used to further edit the colour. When you're ready click OK so the selected colour becomes the active foreground colour.


5/ An alternative and quick way of selecting colours is to download a colour chart similar to the above then open it in Gimp. Now simply use the Colour Selector tool (the eye dropper icon) and click on a colour. This will now become the foreground colour.


6/ The above image shows a selected foreground colour.


7/ In the Palette Editor window click the icon with the green plus sign, third from the lower left. The foreground colour is now added to the palette.


8/ Continue to add colours to the palette by following steps 4 to 7. The above image shows seven colours have been added to the palette. Name the palette in the top window then hit the icon to the lower far left to save it.


9/ You should now see your new palette under the palettes tab.


10/ Now you have your palette it can be used to create a custom gradient. Simply right click on the new palette and from the drop down menu select Palette to Gradient. Your new gradient is now ready to use.


11/ Select the Gradient Tool in the Toolbox panel and in the lower section click on the gradient thumbnail. Now from the drop down list select your gradient.


12/ If you now drag the cursor horizontally in the Image Window your gradient will fill the image space.

Using A Gradient To Create Butterfly Wings

If you want to create your own butterfly images using your custom gradients you'll first need a few layers, one to use as an alpha mask and the other as an overlay. You can either create your own layers or download the ones used in the tutorial here. They're stored on Google Drive so you can be sure they don't include anything malicious.

Once downloaded unzip and open both in the same Gimp image window so they form two layers. One way to do this is to drag them from the unzipped folder to the Gimp image window. Also in the unzipped folder you'll see a texture layer that will be used later in this tutorial, or if you prefer you can use your own texture.


This is the first butterfly layer.....


And this is the second butterfly layer. Make this the active layer and hide the other layer by clicking on the eye icon next to it in the layers tab.


1/ In the image above there are more layers than you'll see in your version of Gimp. We'll just be focusing on the first two layers for this tutorial. Right click on the active layer and from the drop down list select Alpha to Selection.


2/ There should now be an outline of marching ants around the butterfly silhouette. This will mask the transparent background so when we add the gradient it will only appear within the outline.


3/ Select the gradient tool, then from the available gradients select the one you created.


4/ In the bottom half of the tools panel select the Radial option from the Shape drop down menu.


5/ Create a transparent layer above the silhouette layer and make sure its the active layer. It should look similar to the above.


6/ From the centre of the butterfly shape drag the cursor outwards, and fill the shape as above. If you don't like the first attempt, just redo it.


7/ We're now going to add some texture to the butterfly wings and break up the flat colours. First add the texture layer (or one of your own) to the image window, so that its above the gradient layer. The marching ants outline of the butterfly should still be visible.

From the image menu choose Select > Invert. Now press Delete on your keyboard. The texture layer should now look like the above image.

Now hit Select > None and the marching ants outline should disappear.


8/ Towards the top of the layers panel is the Mode drop down menu. This will allow you to integrate the texture layer with the gradient layer in different ways. Go through the list until you find an effect you like. You can also play with the opacity of the top layer to see how that effects the image.

When you're ready right click the top layer and from the drop down menu select Merge.


9/ This is how the two layers look when merged in this example.


10/ Now make the other butterfly layer visible and place it above the two merged layers. Your butterfly is now complete.

The butterfly image is just one example of how gradients can be used with Gimp. With a little imagination there's a whole world of gradient creativity to explore.

Read More
Lusus

Easter Bunnies Jigsaw Puzzle


This year's Easter jigsaw puzzle image comes from the Easter Bunny Trail at Aquamarine Island and is being held to support a young boy with autism under the title of 'The Little  Engine Who Can".

About The Little Engine Who Can

This is the information you can find about 'The Little Engine Who Can' on the trail:
 The little engine who can started out of our want to help others and give back in a more personal way, and raises funds to donate to local autism charities important to the larnia family. The decision came from watching a family member in need, our 5 year old nephew Dylan, who is an amazing little guy who has autism, and so has some special needs and circumstances that need to be met.
The concept of the trail itself is of course to have fun and celebrate Easter by helping the Easter Bunny to search for his lost eggs, and there are 22 to find in total, each filled with free prizes. At the end of the trail there's also a special prize!

About the Jigsaw Puzzle

This jigsaw puzzle can either be played and solved on this page below by dragging and placing the pieces in their correct position. Get comfy before you start though because there's 180 pieces which may challenge some players.

If you prefer you can also download a free version of the jigsaw puzzle to own and keep. The file is stored on Google Drive so you can be sure it doesn't contain anything malicious! Simply download here and enjoy!

More About Dylan And Who The Money Is Going To Help

There is quite a lot of information on the trail, which you can also read here:
Dylan is our 5 year old nephew who has autism, he is a wonderful and special little man with a zest for life, who loves trains and playtime and being with others and family. Autism means Dylan has to learn in different ways, and has needs to be met that might be outside what others usually have to deal with. We have always strived to help him in our real lives as much as we can, and when a need arrose to create a charity idea that really spoke to us here at larnia and on second life, the little engine who can was born. The train represents Dylan's love for trains, and the colors and puzzle pieces are symbols of autism and autism awareness.

Donating to the little engine who can means you are helping charities in our local area that directly help families and children dealing with autism, their needs and therapies, and events to help raise money and awareness to help them out in the community.

 How Can I See Where The Money Is Going?

At littleenginewhocan.blogspot.com we will be posting transactions for any donations made through our program, with amounts and where the money is being donated. We've decided on a threshhold of 50$, so each and every time we raise money through second life and other means, it will be donated at the end of the event, or after a product has been sold for the charity, and the donation and linden conversion posted and shown on the blog. When a threshhold has not been met, the amount raised toward that goal will be posted on the blog as well.

Keep in mind, that the little engine who can is a brand new project, and a work in progress. Awareness of the program through our various events and products will take time, and things may have to be tweaked or worked on to make the program the best that it can be, but larnia is very passionate about autism awareness and helping those in need, and we are committed to making a long lasting, helpful and transparent charity program through the little engine who can.

If you have any further questions about the little engine who can, Dylan's story or how larnia deals with donations, please contact Heath Pevensey.

Read More