Lusus

Symbaloo: A Second Life Start Page

Symbaloo: A Second Life Start Page
For those of us who store a lot of bookmarks from both official Second Life websites as well as residents' blogs, one of the best ways to manage all that content is by using Symbaloo.

Symbaloo is a start page that simplifies managing bookmarks by allowing its users to create a visual icon ('tile') for each bookmark. Symbaloo is therefore a very convenient and easy way to keep track of all your Second Life content, rather than the conventional method of searching through a list of standard bookmarks stored in your browser.

Since Symbaloo  stores all of your bookmarks 'in the cloud' this means you won't lose any of your Second Life bookmarks, and you'll be able to access them from anywhere including on all of your devices. Once you've created a page ('webmix') of tiles you can also share them with the wider Second Life community.

Creating A Symbaloo Webmix 

A webmix is the name Symbaloo has chosen for a page of tiles on a specific subject. For instance, if you are an enthusiastic fashion guru in Second Life you may wish to create a page of tiles dedicated to that subject. Creating your own webmix is simple:

Symbaloo: A Second Life Start Page: Creating a Symbaloo webmix

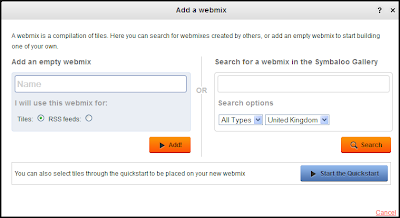
1/ Click the '+' sign at the top of the Symbaloo page and the window pictured above will open.

2/ Give it a name and click 'Add' and your webmix is ready to add tiles to.

As you can see there are other options to begin your webmix, such as using the quick start option. This will allow you to add existing tiles created by Symbaloo to your page rather than starting with an empty webmix.

Adding Tiles To Your Symbaloo Webmix

Once you have a webmix page and named it, adding tiles is easy.

Adding tiles to a Symbaloo webmix

1/ Hover your curor over an empty cell and click it.

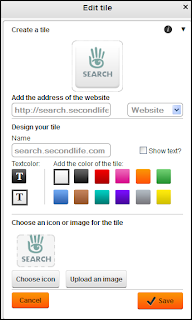
2/ A side window will open (see image above).

3/ Paste a url in the space provided and name it in the space below the url.

4/ The window may then automatically select an appropriate icon for you. You can choose to use that icon, select another, or upload your own image. If you use your own image a small one is best (around 100 X 100 pixels).

5/ When you have finished click 'Save' and your tile will be added to your webmix.

The Second Life Webmix
http://www.symbaloo.com/mix/secondlifewebmix
The Second Life webmix (click to go to page)
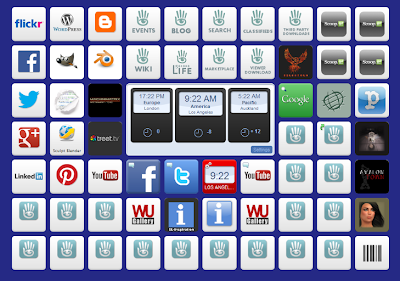
The Second Life Webmix is a selection of urls and SLurls I have collected that are not only useful to me but possibly to a number of other residents (click the image above to go to the webmix page).

Functionality of the Second Life Webmix

The central panel is used to display a number of features when the relevant tile is clicked:

  • Three clocks that can be set for different time zones (very useful for Second Life).
  • Google search
  • A compacted version of your Facebook page and Twitter feed.
  • Your YouTube page can also be displayed here in a compressed form.
  • Any RSS feeds added to the webmix will also be displayed here.

These websites can also be viewed in a new tab in your browser by clicking the appropriate tile. Other popular websites used by creators within Second Life such as Gimp and Blender are also included. Bloggers can also quickly access their accounts through the Wordpress or Blogger dashboard tile.

Second Life tiles on Symbaloo page
Second Life website tiles
The top of the webmix page has all the essential Second Life websites allowing very quick and easy access:

  • Wiki
  • Marketplace
  • Events
  • Blog
  • Search
  • Classifieds
  • Dashboard
  • Viewer Download 
There are also a number of the most popular residents created websites (including of course SL-Inspiration and its sister blog, WU-Gallery). These are sites that are generally the most informative whilst others contain very useful tutorials.

The other tiles are mostly taken up with some of the most popular and useful SLurls, including sandboxes, and some of the more popular clubs and art galleries. Hovering your cursor over each tile will display the name of the SLurl.

Creating Quick Access To The Second Life  Webmix

Once the Second Life webmix has been added to your Symbaloo start page (click on the image above to get it), you can of course use it as your homepage. However, as not everyone will want to do this there is another way to create quick access to it, rather than searching through a list of bookmarks.

1/ Open the Symbaloo page in your browser.

2/ Drag the icon next to the url address near the top of your browser to your desktop. If the url on your desktop does not show the Symbaloo icon, to make it easily recognisable you can do the following:

3/ Copy the Symbaloo icon  image above to your PC.

4/ Right click on the url on your desktop and select 'Properties'

5/ Select 'Change Icon' then click 'Browse'

6/ Browse to where you saved the image above and select it.

7/ Click 'OK'

Now you can instantly access all your Second Life web content as well as your favourite SLurls, which means you can enter Second Life at the place of your choosing and not necassarily your home or last location.

Using Symbaloo as a Second Life start page can be a very useful tool. Try out the page I created, and if you like it you can create and share your own Second Life webmixes on Symbaloo.
Read More
Lusus

How to Use The SL-Inspiration Advertising Blimp


When you recieve your blimp  package it will contain two advertising blimps. The first can be boarded and flown anywhere in Second Life (anywhere that won't eject you!), The second blimp is exactly the same except it has no flight script. Instead when you rez it, it will fly in a circle above your land, with the advertising banner following behind.

You can pick up your Advertising Blimp from the Marketplace.

Flying The Blimp

1/ To fly the blimp, right click on it and select 'board' from the menu.

2/ To power up the blimp, type 'start' in main chat.

3/ Use the page up and page down arrows on your keyboard to gain height or to descend.

4/ The arrow keys control the direction of flight of the blimp.

5/ When you have landed the blimp type 'stop' in main chat to power down the blimp.

Click on 'Stand' to leave the blimp. If you get a little stuck inside the blimp click board again then stand.

Flying the blimp at height

Adding Images To The Banner

The banner at the rear of the blimp can hold multiple images and will rotate each in turn, which is handy for advertising different aspects of your business or sim. To add the images:

1/ Right click the blimp and select 'Edit'
 
2/ in the edit pane select the Contents tab.

3/ Now select 'Edit Link'.

4/ Click on the banner and drag your images from your inventory into the contents of the banner.

If you prefer, you can resize the banner to fit the proportions of your images.

The Advertising Blimp circling the SL-Inspiration store

Clicking The Blimp

When your blimp is in flight, or is rezzed above your land, anyone who clicks on it will recieve a notecard. To add your own notecard:

1/ Right click on the blimp and select Edit

2/ Remove the SL-Inspiration notecard, and add your own to the contents folder.

Your blimp is now  ready to promote your business above your land or store. Its presence alone above your property will make it stand out for some distance, especially if you if you are on the mainland or connected sims.

Enjoy your item and feel free to contact me with any further questions.
Read More
Lusus

Using The SL-Inspiration Rez Box


Using the rez box that is part of your purchase from SL-Inspiration is quite intuitive, but the basic steps are demonstrated here, which may be especially useful for anyone who has not used a rez box before.

After describing how to rez your building from the rez box I also explain how to configure the elevators for those buildings that have more than one floor. It is strongly recommended that this section is read.

What's In The Box?

When you receive your building and have added the box's contents to your inventory you should have the following items:
  • The building rez box
  • a spare elevator (in case anything goes disastrously wrong with the ones included in the build)
  • a location finder
  • a base that can be used for the building
  • a webpage opener (which should take you to this page when clicked)

Using the Rez Box

The SL-Inspiration rez box
1/ First find the rez box in your inventory and place it on the ground. Raise it a metre or so from the ground to ensure all parts of the building rez correctly.

Make sure there is also enough room for the building to rez on your land, as this may also affect how the building will rez.

2/ You will see an arrow on the top of the box. This indicates the direction the building will rez. The front of the building will rez a short distance in front of this arrow.

Select 'Rezz' to rez the building
3/ Click the box to show the menu window (shown above). From the menu select Rezz and you building will unpack from the box and rez.

A building rezzed from the box
4/ To place the building in its final position right click on the rez box and select edit. Now you can move the box, and the structure will move accordingly. Move the box in small and slow increments to ensure all parts move correctly.

5/ When you are happy with the position of the structure click on the box again and select Freeze from the menu. This will fix the position of the building permanently and remove the rez scripts. The rez box can now be taken back into your inventory.

 Configuring the Elevators

The elevators for each building are already in place, and setting them up so that visitors can teleport to each floor is a matter of adding a few lines  for each floor to the Configuration notecard.

It is important to remember however that the building should be fixed in its final position and all the rez scripts removed (as explained above), before configuring the elevators. If you set up the elevators then freeze the building, you may find this has affected how the elevators work. If you have already done this, there is a spare elevator included with your purchase which can replace the already positioned elevators if necessary.

The location finder box
1/ Place the Location Finder that came with your building at the landing point for the first elevator. Click the box and a set of co-ordinates will appear in main chat (see below).

Location co-ordinates
2/ From main chat copy the contents of the brackets.

3/ Right click on the elevator and select edit. Then select the contents tab of the edit pane. Double click on the Configuration notecard to open it.

Configuration notecard for the elevators
4/ Find the line 'Place1=<0,0,0>', and replace the contents of the brackets by pasting the co-ordinates you copied from main chat, (click on the image above for a clearer view).

5/ Give this location a name such as Ground Floor by replacing 'none' in the 'Placename1' section of the notecard. Save the notecard.

6/ Right click on the location finder and select edit again. Move the box up to the next floor and to the next landing point (this will of course involve moving your camera to see what you're doing).

7/ Click the box again so that the next co-ordinates will appear in main chat. Copy them.

8/ Follow the steps for adding the co-ordinates and name to the notecard then save the changes

9/ Once you have configured the name and co-ordinates for each landing point, you can open the notecard again, then copy its contents. You can now paste the settings to the notecard of the next elevator.

10/ when you are finished you can test your elevators. Click on the elevator button and with each click a different floor is selected (you will see the name you gave each floor). When you have the floor you want, right click on the button and select 'Teleport". This will take you to the new floor.

Once you are happy with the set up of the elevators you can say '/12 LOCK' in main chat which will lock the co-ordinates you set up in the configuration notecard.

Thats all there is to rezzing your structure and configuring your elevators. Enjoy your new purchase, and feel free to contact me with any further questions.


Read More
Lusus

Creating a Web Button in Gimp

 This is quite a comprehensive tutorial on how to create a web button in Gimp, and since there are many styles of web buttons, I will first show how to create the standard shiny Web2 button, then a simple matt effect button. I will then use the matt web button to show how to make a rollover button using CSS rather than javascript.

Creating a Shiny Web 2. Button

1/ Open Gimp and create a new transparent layer to a size that suits the button for your website. The buttons here are large to make the images clearer for explaination purposes.

24mvrjs.jpg

2/ Choose the Rectangle Select Tool from the Toolbox then draw out the shape of your button. Make sure the rounded corners option has been selected and you have added the size of the curves for your button. Something between 15-20 should be good.
2q8vsbt.jpg
3/Once you have drawn you button use the Bucket Fill tool to fill it with colour, then add another transparent layer.

4/ From the Select menu click on Shrink and choose a setting of around 2, then click OK. This will create a clean edge for the button.

Adding Gradients


5/ Now select the gradient tool. With white as the foreground colour select the FG to Transparency gradient. Using the image below as a guide, add the gradient to the active layer. You can tweak the opacity of the gradient if it looks too stark.
6/Create a new layer and select the Rectangle Select tool again. In the upper half of the button draw a rectangle as in the image above. Now fill it with same gradient you used earlier so the new selection looks similar to the image below.
7/ Add another layer and using either the Paintbrush or Pencil tool draw a straight line towards the bottom of the button, using a size of brush that looks natural for your button. Now select Filters > Blur > Gaussian Blur and in the window that opens add a blur of around 12. Now click OK and your button should look something like the image below.

Adding Text

8/ Select the Text icon from the Toolbox and click on the button image. In the window that opens type in the text for your button, With the text window still open, you can select the size, font and color of your text in the Toolbox panel. When you are happy with your text click OK.


9/ To give the text more definition you can add some shadowing. Select Filters > Light and Shadow > Drop Shadow. In the window that opens set the X and Y offsets to 0, and the blur radius to around 10, then click OK.

10/ To add more definition to the button, make the original button layer the active layer and then select Drop Shadow from Filters again. With the same settings for the text click OK.

Creating a Matt Button

Fashions change in web design and matt buttons are appearing more and more. They are simpler to make than shiny buttons too.

1/ Follows steps one to four above.

2/ using the Gradient tool with the same settings as above, add a gradient that suits your button. You can tweak the opacity of the gradient as well as giving it a Gaussian blur. However, if you do add a Gaussian blur as well as a drop shadow to the button it will tend to have an out of focus appearance. One or other of the effects is advisable.

Creating Rollover Buttons with CSS


To create your rollover button you will need to create an image of two buttons with one placed directly underneath the other. The lower one will be what is shown when a cursor hovers over the button.
The purpose of stacking the buttons as one image is that it helps to avoid flickering when the cursor is placed over it, as well as keeping down the number of images you need to add to your website.

HTML code for the Button

The HTML for the button is one simple line of code:

<a id="wugallery" href="#" title="Wu Gallery"><span>Wu Gallery</span></a> 
 
The link is given an id so that it can be styled with CSS. When creating your own button, you will naturally give it its own id, and add your own title. The text between the span tags is what search bots will see, but will be hidden in regular browsers.

The CSS code

#wugallery{
  display: block;
  width: 100px;
  height: 25px;
  background: url("wugallery.gif") no-repeat 0 0;
}

#wugallery:hover {
  background-position: 0 -25px;
}

#wugallery span {
  display: none;
}
The width element in the code should be the same width as the buttons, but the height is half the image of the two combined buttons. The URL segment is the path to your button image. Run your cursor over the button below to see how it works in practice.


That is essentially all there is to creating rollover buttons with CSS. To create more than one button is simply a matter of giving each button a unique id in both the HTML and CSS code, as well as changing the URL path for each button.

Read More
Lusus

Pylon


I took this snapshot some time ago at Virtual Decay, a sim whose theme is one of urban post apocalyptic breakdown, with lots of detailed grungy vintage buildings. There's lots of potential there for Second Life photographers.

Using the Jigsaw Puzzle

Using the jigsaw puzzle couldn't be easier, simply click on each piece in turn and slide it into position. There is also a timer so you can see how quickly you can complete it. If you need more space for the puzzle simply click on the thumbnail which will take you to Jigzone.com where jigsaw is stored.

Pylon Jigsaw Puzzle


Add the Jigsaw Puzzle to Your Own Website

To add this jigsaw to your own website just copy and paste the code below to your webpage editor. This can be a good way to entertain your visitors. You can also have your own favourite Second Life images converted to jigsaw puzzles. More details here.


Read More
Lusus

Balloon Makers Kit


The Balloon Makers Kit is for people in Second Life who want to quickly create and customise their own balloons with either images or text (or both). It comprises of a balloon sculpty map, as well as some example balloons and textures. This means the balloons can be used straight out of the box or can be personalised.

You can collect your free Balloon Makers Kit from the Marketplace.

Adding Your Own Text or Images

To make it easier for creators to customise their balloons  I have made available a Gimp file that includes the balloon textures and shadow maps. This means text or images and even your own textures can easily be added to the balloons.

The steps below describe how to use this file, and will provide a newcomer to Gimp with another easy to follow tutorial which covers a number of useful features that can be applied to other projects .

The first thing to do is download the Gimp Balloon Textures file. Use the free download option. Once the file is downloaded, double click on it to open it. This assumes you have Gimp installed on your PC.


Adding Text to a Balloon

Adding Text to a balloon has been made very easy.  In the Layer Dialogue window click on the 'Text goes here' layer, then select the text option from the Toolbox window (Text is the capital A).

Now in the image window click where you see the text, delete it by pressing backspace on your keyboard, and replace it with your own text. Go back to the Layers window and turn off the Drop Shadow layer by clicking on the eye icon.

Making sure the text layer is still the active layer, select Filters > Light and Shadow > Drop Shadow. A new Window will open where you can add a subtle shadow to the text to make it more distinct. Change the settings to match those below then click OK.


Back in the Layers window again, right click on the text later and from the drop down menu select 'Merge Down'. This will merge the text with the drop shadow layer.

In the image window, select Layer > Autocrop Layer. This will make it easier to adjust the position of the text if you need to. To do this in the Toolbox window select the move option ( a four headed arrow icon), then make sure 'Move the active layer' option is active. You can find this below the icons in the Toolbox.

With the text layer still active, in the image window hold down the right mouse button over the text and you will be able to drag it to a new position. When you are happy with its placement let go of the mouse button.

Changing the Balloon Colour

Looking at the different layers, you'll see there are a number of options for balloon colours. Simply activate or de-activate each layer by clicking on the eye icons to change the background colour.

You can also add your own colours. Make the yellow layer active by clicking on it. Create a new layer by clicking on the icon to the far left below the layers window,(the icon looks like a piece of paper with a folded top right corner).

With the new layer the active layer, go to the Toolbox panel and click on the black square below the tool icons. This will bring up a colour selector window, (see below).


Simply play with this window until you get a colour you like. Once you've finished, at the top of the layers window activate the 'Balloon Shading' layer to add highlights and shading to the colour.

Saving Your Balloon Texture

To save your balloon texture go to the Layers panel, right click on the top most layer and select 'Flatten' from the drop down menu.

In the image window select File > Export. In the window that opens, give your texture a name and file extention. PNG is probably the best to use for Second Life Textures:
Texture-name.png
 Now your balloon texture is ready to be uploaded and added to your balloon in Second Life.

Adding Images or Your Own Texture to a Balloon

If you want to give the entire balloon a new texture, make sure the image is 1024 X 1024. Add the image by selecting File > Open as Layers. The texture will now be above all the other textures, so move it below the shading layer by clicking on the green down arrow thats below the layers window. Activate the shading layer to add highlights to your texture, then follow the steps above to export the texture.

You can also add an image and use a colour layer as background. Import the image as above. The layer can be resized by selecting Layer > Scale layer which will open a new window. Choose a size that suits the balloon. Click the Scale button to resize the image layer and to close the scale window.

If the image is small you may want it to appear twice, on opposite parts of the balloon. To do this, select Layer> Autocrop Layer. This will make the image layer easier to position. Below the Layers window click on the icon third from the right. This will create a copy of the image layer.

To make sure the images are aligned on the balloon accurately a guide line can be used. Click on the Move icon in the Toolbox window and make sure 'Pick a layer or guide' is selected. From the bottom (or top) edge of the image window drag your cursor to create a guide line. position it on the bottom edge of the image. Now when you move the image copy it will snap to the guideline.


In the Layers window, click on the layer that is the copied image and move it into position. You may need to adjust the position of both images so they are spaced correctly.

When you are happy with the placement of both images the texture is ready to be exported then uploaded into Second Life.


As you can see, using the Balloon Makers Kit is quite quick and easy, and although this tutorial may seem involved, a lot of the information is aimed at those unfamiliar with Gimp. Each step taken by itself is hopefully easy to follow.

Read More
Lusus

Rusting Flower


Rusting Flower is one of a number of digital images I created as part of a series of 3D fractals, some of which can be seen inworld at WU Gallery. Fractal imagery is quite wide spread in Second Life, but once I saw the possiblity of doing something different the temptation to experiment was too much to resist.

Like all digital art, software is need to create it, and in this case the software used was Mandelbulber, which is not entirely intuitive and can lead to something of a learning curve. The results for each person will however inevitably be unique. For more information on fractals I have written a post on my WU Gallery blog called Creating 3D Fractals With Mandelbulber. As well as explaining something about fractals there is some useful information and links about the software with an overview of how to get started for those who may want to create their own 3D fractals.

Using the Jigsaw Puzzle

Using the jigsaw puzzle couldn't be easier, simply click on each piece in turn and slide it into position. There is also a timer so you can see how quickly you can complete it. If you need more space for the puzzle simply click on the thumbnail which will take you to Jigzone.com where jigsaw is stored.

Rusted Flower Jigsaw Puzzle


Add the Jigsaw Puzzle to Your Own Website

To add this jigsaw to your own website just copy and paste the code below to your webpage editor. This can be a good way to entertain your visitors. You can also have your own favourite Second Life images converted to jigsaw puzzles. More details here.


Read More
Lusus

Camera Control Hud for 3D Images


This is a simple camera control hud based on Azurei Ash’s camera script. The purpose of the hud is to help users create stereo images that can be turned into anaglyph 3D images. I have created a tutorial  naturally called How to Create 3D Images for Second Life describing how to do this. You can pick up a free copy of the 3D Camera Hud from the Marketplace.

 Using the Camera Hud 

Unpack the camera to your inventory and wear it. You should then see a hollow blue square to the centre of your screen. This can be used to help position the camera and frame the subject of your snapshot.


 Click the square and it should turn red and move to the default camera position.


To move the camera to the position you want use these keyboard controls:

Left Arrow……….Rotates the camera to the left
Right Arrow………Rotates the camera to the right
Up Arrow…………Zooms the camera
Down Arrow………Zooms the camera out
Pageup……………Moves the camera upwards
Pagedown………..Moves the camera downwards

To pan the camera hold down shift and either the right or left arrow key Because the hud is configured to move the camera in small precise increments to create stereo images, it can take a while to move it into the initial position to frame the first snapshot. To make the camera move faster, hold down the left mouse button.

Taking stereo images 

Taking stereo images is simple. Position the camera for the first snapshot and save it to your hard drive. Pan the camera by holding down Shift then tapping either the right or left arrow key. Now save the second snapshot.

If you are using the hud to create anaglyph 3D images, then it is a good idea to take a series of snapshots. Take one, then pan the camera slightly then take another and so on. This way you will have a number of images to experiment with to get the best 3D image of your subject
Read More
Lusus

Babbage Palisade


Babbage Palisade is an industrial themed sim with a strong slant towards steampunk, complete with trams and smoke billowing from factory chimneys; an ideal subject for this downloadable jigsaw puzzle. The sim owner, Mosseveno Tenk describes it as,
a sooty northern industrial City-Nation of the steampunk imagination, loosely based on the era of 1830 to 1890. Tourists are a common sight and are welcomed. The City has a rich history dating back to an earlier clockwork technological period, hinted at but largely unexplored.
I took the image of the clock tower at Babbage Palisade some time ago, working it quite heavily in Gimp by creating a subdued palette then merging it with a grunge texture to add a worn appearance.

This jigsaw  can be downloaded from My4shared for you to keep and share with friends. There are over 100 pieces so some may find it a little challenging, but hopefully worth the effort.

Buy prints of Babbage Palisade on Bigoom

Read More