Lusus

Creating Glitch Art With Second Life Images


One of the current trends in digital art is the intentional corruption of image files to simulate interferences, or a broken image. Rather than throwing one's arms in the air in frustration at a corrupted file, glitch art embraces these errors and turns them into art. This is of course possible to do with images taken in Second Life, and if you'd like to turn your preciously refined snapshots into a different kind of art form thats all the rage, then follow this tutorial on creating glitch art with Second Life images.

Audacity

To create your glitch art you will first need a snapshot saved as a BMP file and edited to your liking. Secondly you'll need to install Audacity, which can be downloaded for free by following the link. Although Audacity is an audio editing software it works well for opening BMP image files and using its features to add errors to the image.


I took the above image at The Great Fissure in Second Life, which I then cropped and tweaked a little in Gimp. Once you have downloaded Audacity follow the steps below. You can click on the pictures to see full size.


1/ Start up Audacity then select File > Import > Raw Data.


2/ Navigate to the BMP image you want to use then select Open. In the window that opens (see above), select U-Law from the first drop down menu and Little-endian from the second. Now click Import.


3/ The image will appear in Audacity as if its an audio file, and if you want you can press the play button to listen to it (it will probably sound terrible). Drag your cursor over part of the 'audio' wave (highlighted in red), avoiding the beginning as this contains important information that allows the file to be opened.


4/ Now click on the Effect menu and from the drop down list select one of the editing options. There is some trial and error here to find which of the Effects options creates distortions to the image that you like.


6/ In this example Change Pitch has been selected and in the opening window shown above I randomly played with the settings before hitting OK.


7/ Drag your cursor over another section of the 'wave' to select another part of the file, and then select another option from the Effects menu. In this example Wahwah was chosen. When you have tweaked the settings hit OK again.

8/ Select random parts of the file and then select other options from the Effects menu. Its probably best not to do this too many times to begin with, until you have an idea how the image will be affected. There will be some trial and error involved, although the whole process doesn't take too long, so creating new images from scratch if you need to isn't too time consuming.


9/ When you are ready, select File > Export and the window above will open. Name your file and give it a BMP extension, highlighted in red. Navigate to the folder where you want to save your image and click Save.


12/ If everything has gone to plan you should see a window as above. Click Yes.


13/ The above window will now appear. Click OK and your image will be saved to your PC.


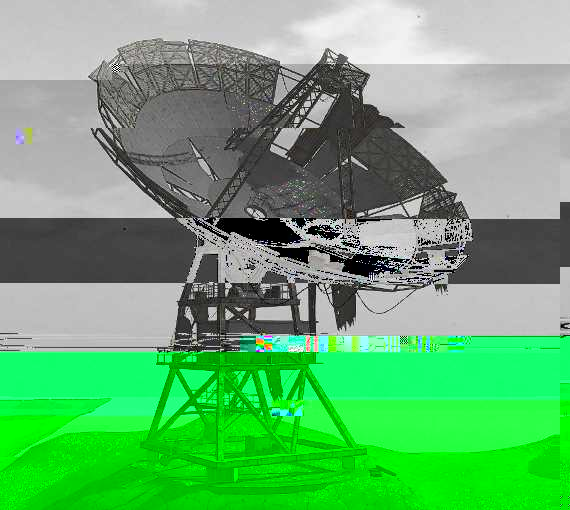
This is how the image from Audacity looked when I saved it to my PC. Sometimes when you try to open the image in Window's image viewer it may not recognise the file. If this happens try opening it in Gimp or Paint and saving it again, maybe as a PNG file. Sometimes unfortunately you'll just have to start again.

Snorpey.github


Using Audacity is not the only way to create Glitch art. In fact there is an online resource at http://snorpey.github.io/jpg-glitch which can be used to further work on an image after exporting it from Audacity, or the website can be used by itself. The above image shows the Audacity image after being worked on further at Snorpey.


Using the website is quite intuitive. First you'll need a PNG or Jpeg image to upload (not a BMP file this time), and then its a matter of adjusting the four sliders above the image to get the result you want. There is also a Randomise button to experiment with.


Once you have finished editing the image hit the download button and then click on 'download bitmap file', to save it to your PC.


The above image shows the same subject edited entirely on  Snorkey without using Audacity. Although the website is very effective and easy to use, the end results are different to what Audacity produces, so it will be a personal choice what you use and whether you mix and match both approaches.You may also find Snorkey has a limit on uploaded file sizes.

Thats all there is to creating your own glitch art, so have fun experimenting with your Second Life snapshots and if you feel like it do share them with me online.
Read More
Lusus

Merry Christmas Jigsaw Puzzle


As a way of wishing everyone in Second Life and beyond a Merry Christmas and a Happy New Year I have created a festive themed jigsaw to download and keep. Once its downloaded just unzip the file, double click on the jigsaw icon and you're ready to solve the puzzle. The puzzle is stored on Google Drive, which you'll be pleased to know scans files before they're downloaded, so you know all downloads are safe.

Click the link above to receive your puzzle. Merry Christmas and a Happy New Year!

Read More
Lusus

Creating Animated Gifs With Second Life

In a recent post I described how to create animated gifs for Second Life and how to add them to a prim. In this follow up tutorial I will explain how animated gifs can be made using the basic features of Second Life. The results can be very similar to those created in 2D or 3D software, but will take just a fraction of the time.

What you choose to turn into an animated gif is really up to your imagination, but I have chosen to use for this example a quite simple item constructed out of a number of flattened and hollowed cubes, designed to imitate an animated gif that might be created in 2D software.

There are two principle ways of generating animated gifs in Second Life. The first is to use the lightweight and easy to use program called Gifcam. The Second is to use video capture software and Gimp with its GAP plugin.

If you need to, you can click the images here to view full size.

GifCam


Gifcam is a very handy free utility that will create an animated gif from any movie or animation on your screen, and is very easy to use. You can get the software here. Once you have set up your creation in Second Life ready to turn into a gif, follow these instructions.


1/ Start up Gifcam and it should show on top of your Second Life viewer. Hold down the left mouse button and drag the edges of Gifcam's image window to frame the item you have created.


2/ Click the down arrow to the right of the Rec button and select a frame rate for your animation, (see image above).

3/  Click the Rec button to start recording your gif. Try to start and end at the same place in the animation of the object to allow smooth looping of the final gif animation. 

4/ Click the Rec button again to stop recording.


5/ Click the down arrow next to the Save button to see save options, and select what you feel is best for your gif animation. As this example is mimicking the optical illusion of flat white squares rotating I have selected Monochrome, but if you aren't sure what to select stick with Quantize.

6/ Click Save, name your gif and Gifcam will start to process your animation. Once its finished your gif will be created and saved to your hard drive. You can view it before uploading it to the web with Quicktime.

7/ If you are happy with your animated gif then you are finished, but if you feel it needs tweaking Gifcam has a few built in options.


8/ Click the down arrow next to the Rec button and select Open and load your gif animation. Now click the Edit button. A new window looking similar to the above will open. Don't worry if all the frames in your gif look green here.

9/ Using the slider to the bottom of this window you can scroll through the frames of your animation. If you want to delete some frames from the beginning scroll through to the last frame you want to delete. 

10/ Right click your mouse and from the drop down menu select Delete From This Frame To Start

11/ To delete frames from the end of the animation scroll through to the first frame you want to delete, right click on your mouse again and select Delete From This Frame To End. These two steps are a quick and easy way of ensuring your animation loops seamlessly.

12/ Now save your animation again and you are done.

Alternative Method

As you can see creating animated Gifs with Gifcam is quick and easy although there are a few downsides. The finished animation may not be as crisp as you'd like, and if you intend to add it to a prim face in Second Life this will become more obvious, since gifs tend to run slower once added as media on a prim.

The alternative method is more involved but on the whole produces better quality gif images. There are three stages to this method:
  • Capturing the animation. For this you will need video capturing software such as Fraps. Its not free but is relatively inexpensive.
  • Video converting software. You will need to convert the video captured in Fraps to an MP4 file. The best free option I have found for this is WinX Video Recorder.
  • Converting the MP4 into a gif animation. For this you will need Gimp installed, along with the GAP plugin, which can be downloaded here.

Capturing The Animation

1/ Position your camera in Second Life ready to begin capturing the animation or scene (or whatever the subject of your gif is).

2/ Start up Fraps and hit the F9 key on your keyboard to begin capturing. Press F9 again to stop recording.

3/ Your video will automatically be saved to your hard drive. You can now close Fraps.

Converting The Video


1/ Start up WinX Video Converter and then click the Video button to the top left. Navigate to where your video is located on your PC and open it. WinX should now look something like the image above.

2/ You can tweak the quality of the converted video by adjusting the slider in the smaller window. When you are ready click OK. Now hit the Run button. It shouldn't take too long for WinX to convert your video to an MP4 file.

Converting The MP4 File To An Animated Gif


1/ Start up Gimp, and assuming you have the GAP plugin installed select Video > Split Video Into Frames > Extract Videorange. A window similar to the above image should open.

2/ Click on the button to the top right and navigate to your MP4 file and open it.


3/ Click on the Video Range button and the window will extend as above. Move the slider at the top right of the window all the way to the right. If a window opens offering you the libavformat option click OK to accept.

If your MP4 is quite large it may take a while for all of the frames to be loaded, so its best to be sure they are all there before moving on. You'll be able to tell because of the number of frames. If it seems low, wait a while.

4/ Set the Audiotrack option to zero.

5/ Click the button just to the right of Basename and navigate to a folder where all the frames of the animation will be stored. Its a good idea to create a folder specifically for this before you begin.

6/ To the right of the window tick the Loop and Selection Only boxes.

7/ To the top right, just under the slider there is a window that shows the number of frames of the video. To the right of that is a button. Click it so that all the frames are selected. To the top left you should now see the From Frame box set to 1, and the To Frame box set to the last frame.

8/ Click OK.

9/ Now select Video > Frames to Image and wait whilst Gimp proceeds. When this step is complete Gimp will open a new image window and you will see each frame of the video loaded as a layer in the Layers panel.

10/ Since Fraps captures the entire screen the frames will need to be cropped. Drag the Rectangle Select Tool over the part of the image you want to keep, then select Image > Crop to Selection.

Its just as well to keep this step in mind when you're capturing the video with Fraps in Second Life, because if you zoom too closely to the scene or the object the animated gif will be too large, but if you zoom out too much it will be too small.

11/ If the frames are too large you can now scale the image by selecting Image > Scale Image.


12/ You can now view what your animated gif will look like by selecting Filters > Animation > Playback.

13/ If your animation doesn't loop seamlessly you can work out here which frames to delete by using the Step button. The area below the view window will show you what frame is presently being viewed. If this is the frame you want to start on, make a note of it. 

You can follow the same process to find the last frame you want to end with. Both the start and end frames should be a very close match in appearance for the animation to loop well. Once you know the start and end frames, you can delete the layers of the frames you want to get rid of.


14/ Your Gif animation is now ready to be exported. Select File > Export As  and name your animation with a gif extension:
mygifanimation.gif
A window similar to the above will open. Tick the As animation and the Loop forever boxes and then hit the Export button. It may seem as if Gimp hangs at this point, but be patient and it will get there.

Your animated gif has now been created and you can view it in Quicktime before uploading it to the web.


This is the animated gif I created using this method, and it pays to compare it to the gif created with Gifcam. Whilst the shapes are better defined here the white isn't as pure as with the Gifcam example. Also the animation is a little slower.

Adding Your Completed Gif Animation To A Prim

There are pros and cons to both these methods of creating animated gifs. Whilst the first is quick and easy, the second tends to produce a higher quality image. 

If you're not too concerned about image quality and intend to add your gif to a prim face then using Gifcam will probably suit you. However, if you want the best quality gif then using the Fraps and Gimp method is probably better. If this is what you decide then you may find you need to tweak the animation along the way. 

Since gifs can run slower in Second Life you will have to keep this in mind and be prepared to adjust things like frame rates, the delay between each frame and the size of the image. It has to be said there is a certain amount of trial and error to get an animated gif to look just right within Second Life. In the final analysis however, Second Life is a good tool for creating animated gifs, and they work very well on a webpage.

You can see a few more examples of animated gifs I created in Second Life on my other blog, Lusus.art.

Read More
Lusus

Creating Animated Gifs For Second Life

animated gif tutorial on SL-Inspiration

Most Second Life residents have seen scripted animated  gif images of dancing mice or frogs and the such like, and whilst they serve their purpose they can be of poor quality and can cause lag. There is another way however of creating animated gifs for Second Life that bypasses the lag issue, and that is to use media on a prim.

In this tutorial I will show how to create an animated gif using Gimp and how to add the animation to a prim.

Creating The Animation

Before creating a gif animation you will need a short video to convert into a series of images that can be loaded into Gimp. The process of turning the video into a series of images will need movie editing software, but if you have made the video yourself you probably already have software you can use.

If you are going to source a video from elsewhere then you need to be sure you are not in breach of copyright regulations. Having said that Youtube videos are often used for this purpose and there are a number of websites that can be used to transform them into animated gifs. These sites include;

Because I wanted to create a series of arty animated gifs I used software called Whorled which is freeware. Whorled was designed to create animated sacred geometry images but it works very well, at least for my purposes. It also contains the options of saving the animations as avi files or to save each frame as a bitmap.

Using Gimp To Create The Gif File

 Once you have converted the video into a series of images they can be loaded into Gimp.


1/ Start up Gimp and then select File > Open as Layers. Browse to the folder containing the converted video images and select the first. Scroll down to the last image and holding down Shift click the last one. All the images should now be selected. Click Open. All the images should now load into Gimp, which may take a while.

2/ Now that the images are all in Gimp, select File > Export As. In the window that opens give the file a name with the extension gif:
 Myfilename.gif


3/ A window similar to the above will open, and you will need to make the same selections that are shown here. Click Export. Don't worry if Gimp seems to hang at this point because it might take a while for it to create the gif file. Finally, you will have your animated gif file.

Before showing the animated gif in Second Life you will need to find a reliable web host to upload it to. For my animated gifs I uploaded them to Blogger.

Once the gif file has been uploaded, view the page then right click on the image to copy its url. Now click on Copy Image Location from the drop down menu. You will later need to add this to a prim in Second Life.

Adding The Gif Animation To A Prim In Second Life

1/ Start up your Second Life viewer and go to a place where you can build. Rez a cube prim and resize it to your liking.


2/ Go back into edit, and in the edit pane click on Select Face then click on one side of the prim.

3/ Under the Texture Tab click on the dropdown tab which should either show as Materials or Media. You need to have the Media option selected (highlighted in red above).


4/ Under the Media tab select Choose and another window will open. At the top of this window paste the url of the gif image, then click Apply and OK. Your animated gif should now appear on the face of the prim.

Adjusting The Appearance Of The Gif On The Prim Face

You may find the gif image only takes up part of the prim face, but you can change this by altering the horizontal and vertical scales under the Texture tab in the edit pane. A scale of 0.4 worked well for me. You may also need to adjust the vertical and horizontal offset, again under the Texture tab.


If you want to hide the Control Bar and disable navigation and interactivity (which I think looks more professional) you can do this under the Customize tab in the Media Settings window.

This is all there is to adding an animated gif to a face of a prim in Second Life. You will find this method causes much less lag than the scripted method, although it may take a second or two for the gif to appear. Residents will also need to use a viewer that enables media on a prim, and have the option activated.

Creating animated gifs isn't just about having a dancing mouse in your in-word store window, but it is an art form in its own right. Its an area where you can let your imagination run freely and just to prove it Google animated gifs and you will find plenty of fantastic examples.

You can see more of my animated gifs on my other blog Lusus-art.

Read More
Lusus

Neufreistadt

Neufreistadt in Second Life, on SL-Inspiration

Neufreistadt is a very well constructed location in Second Life that is a pleasure to visit, offering many opportunities for photographers. For the casual traveler there is everything here, from residences, shops, an art gallery, a monastery and more.

Another feature that makes this location distinctive is it's role in the Confederation of Democratic Simulators. As its website explains;
The Confederation of Democratic Simulators is the oldest democracy in Second Life. Originally founded in 2004 as the City of Neualtenburg in the Anzere region, the Confederation of Democratic Simulators (C.D.S.) is now a five-region community operated by the citizens.
The CDS also has a Facebook page which along with it's website gives a good overview of all the activities on the sim.

Download The Jigsaw Puzzle

The above image I took whilst visiting Neufreistadt and used to create one of my Droste images (see the tutorial here on how to create a Droste image to see the result). I also thought I would share this picture as a jigsaw puzzle that can be downloaded for you to keep and play on the PC. Simply click here to download the zipped file and then double click the jigsaw icon once unzipped.

Your Own Image As A Jigsaw Puzzle

If you have a Second Life image you would like to share as a jigsaw then full details of how I can do this are included in the pdf document included with the download.

This jigsaw puzzle is a little challenging so grab a coffee and set aside around an hour to work on it, and enjoy.

Read More
Lusus

How To Add A Random Page Button To A Blogger Blog


After adding a random page button to this blog and to another I help to run, The Chilly Bear  I was asked a few times how to do this. So in the hope this will be useful I have decided to write this tutorial on how to add a random page button to a blogger blog.

Creating the Graphic For The Random Page Button

Firstly I should point out I am not a scripter so I didn't incorporate the button graphic into the javascript, but used the work around described here. If anyone knows how the graphic could be embedded into the script please add a comment below.

To create the button graphic you'll need to know the width of the sidebar on your blog where the button will appear. To find this:


1/ Open your Blogger Dashboard and on the blog you want to add the button to, click on the small arrow to the right of the blog name to reveal the drop down menu (highlighted in red above). Select Template.


2/ Click the Edit HTML button to view the blog template. 


3/ You'll need to view the blog's CSS file which will tell you the width of the sidebar. If you can't see the CSS of the blog find this line towards the top of the template:
<b:skin>......</b:skin>
then click on the triangle by the template line number (see image above).


4/ scroll down the blog CSS until you find a line similar to the above. As you can see in this example the width of the sidebar is 312px.

All CSS files are different for each blog template, so the line may appear differently for you, but there should be a line showing the width of the sidebar for your blog.

Now the we know the width of the sidebar we can begin to create the button graphics. Open your graphics software, select New then for the width of the graphic enter the width of the sidebar, and the height you want your graphic to be.

If you don't want your random page button to take up the full width of the sidebar, start with a transaparent layer and centre your button when you create it. When you export your graphic make sure it has an alpha channel so the background remains transparent.

You can be as creative as you like with the appearance of the button. Since the Chilly Bear is a Second Life club and music themed blog the button I created for it is a record label, (the image at the top of the page).

Once you have created the button graphic upload it to an image hosting website, such as Photobucket. You will need the code for direct layouts later.

Adding the Random Page Script To The Template

To create the random page button you will need to add a script to your template. Before you edit your template remember to create a backup by going to your template page and clicking the Backup/Restore button to the upper right.

1/ Copy the script Below:
<script type='text/javascript'>
/*<![CDATA[*/
function showLucky(root){ var feed = root.feed; var entries = feed.entry || []; var entry = feed.entry[0]; for (var j = 0; j < entry.link.length; ++j){if (entry.link[j].rel == 'alternate'){window.location = entry.link[j].href;}}} function fetchLuck(luck){ script = document.createElement('script'); script.src = '/feeds/posts/summary?start-index='+luck+'&max-results=1&alt=json-in-script&callback=showLucky'; script.type = 'text/javascript'; document.getElementsByTagName('head')[0].appendChild(script); } function feelingLucky(root){ var feed = root.feed; var total = parseInt(feed.openSearch$totalResults.$t,10); var luckyNumber = Math.floor(Math.random()*total);luckyNumber++; a = document.createElement('a'); a.href = '#random'; a.rel = luckyNumber; a.onclick = function(){fetchLuck(this.rel);}; a.innerHTML = 'Random Post'; document.getElementById('mbl-random').appendChild(a); } </script><script src="/feeds/posts/summary?max-results=0&alt=json-in-script&callback=feelingLucky">
/*]]>*/
</script>
2/  Go to your template page and click on the Edit HTML button to view the template.

3/ Scroll to the bottom of the page and just above the closing </body> tag paste the script.

4/ Save the template.

 Adding The Random Page Button To Your Blog

1/ To add your button, go to the Layout page of the blog and Click on Add A Gadget for the Sidebar.

2/ Select a HTML/Javascript widget and paste this into the window:
<div class='box'>
<div class='random page'>
  <div id='mbl-random'/>
<style type='text/css'>
#mbl-random a{
  display: block;
width:width of the button graphic;
height: height of the button graphic;
background: URL(url of the button) no-repeat 0 0;
font-size: 0px;
  }
</style>
</div>
</div>
3/ Replace 'width of the button graphic' with the width of your button in px. This should match the width of the sidebar.

4/  Replace 'height of the button graphic' with the height of your button.

5/ Replace 'url of the button' with the url for direct layout of the uploaded graphic.

6/ Click Save.

Your random page button should now appear on your blog

Troubleshooting

Because all templates are coded differently it may be that your random page button only appears on the home page of the blog. If this is the case you can make it appear on all pages by creating a widget for the button in the template.


1/ Open your template again and scroll down to where you see a line similar to the above, highlighted in red.


2/ Scroll further and you should see a search widget and as well as others, such as a social profile widget.

3/ Normally a random page button would be placed below these widgets, so when you scroll just past them add the following:
 <!--Random Page Widget-->
<div class='widget-container'>
<div class='random-button-widget'>
widget text
<div class='clear'/>
</div>
</div>
 Replace 'widget text' with the code you added to the sidebar widget when editing the layout.

5/ Save the template.

4/ Delete the widget you originally created when editing the layout.

Your random page button should now appear on each page.

Having a random page button on your blog can be very useful for bringing forward older posts that visitors may still find interesting, but were otherwise hidden among the numerous other posts you may have. It can also help to keep people on your blog for longer. If you find this tutorial useful then why not share it with friends.


Read More
Lusus

How To Create A Droste Effect With A Second Life Image


Second Life photographers experimenting with the Droste effect is not something I have come across before so it was intriguing to see what was possible and how this technique could be applied to an image taken in SL.  Needless to say the Second Life image could be replaced with a real photo although this may involve a little more preparation for the photo used.

For this tutorial I use Gimp but it is also possible to create Droste images with Photoshop. If you prefer to use Photoshop you will need the Pixel Blender Plugin. For Gimp users you will need the Math Map Plugin.

What Is The Droste Effect?


If you are new to Droste images then a little explanation may be useful. The name Droste is taken from a Dutch Cocoa company whose packaging showed an image of a nun carrying a tray with another cocoa carton showing the nun carrying the same tray. That tray also has a carton showing the nun carrying the tray, and so on. In short, the Droste effect is an image appearing within itself again and again.

Installing The MathMap Plugin 

Before we begin to create a Droste image using Gimp you'll need to install the MathMap plugin. You can find the download link above. If you're using Windows 7 and above with Gimp 2.8 you may find that your first attempt to install the MathMap plugin was unsuccessful as it instals to a default Gimp 2.6 folder. To make sure it is installed correctly:

Download the plugin using the link above. During the instal process, change the directory from "C:\Users\your name\.gimp-2.6" to  "C:\Users\your name\.gimp-2.8". Start up Gimp and you should find the plugin under Filters > Generic > MathMap.

If after doing this MathMap still hasn't installed correctly then you can manually move the MathMap plugin files from the 2.6 plugin folder to the 2.8 plugin folder. Then move the mathmap folder to the 2.8 folder.

Creating The Droste Image


Now that the MathMap plugin is installed (hopefully without too much trouble) we can start creating a Droste image. The first thing you'll need is a good Second Life image. I took this picture at Neufreistadt - a very picturesque location and a good place for Second Life photographers to visit.

When you take your snapshot it is a good idea to make it as large as possible because the process of creating the Droste effect tends to produce a smaller finished image. The size of this picture was around 3060 X 1266 px. A wide image as above is also recommended.

1/ Open your image in Gimp and do any editing you want such as cropping etc.

2/ Right click on the image in the layers panel and select 'Add Alpha Channel' from the drop down menu.This is so we can autocrop the image later.


3/  Select Filters > Distorts > Polar Coordinates. This will open another small window as below. Make sure your settings are the same as in the image with 'Map from top' unchecked.


4/ You should see something similar to the above image in the Polar Coordinates window. Click 'OK' and then select Image > Autocrop Image.


5/ Now Select Filters > Generic > MathMap > Map > Droste (see above).


6/ You should now see a window similar to the image above. Under the User Values tab there are plenty of options to play with, but the principle sliders to create your Droste effect are the Inner Radius and Outer Radius sliders. The Periodicity slider is also useful as well as 'TilePoles' and 'DoNot FlattenTransparency'.


7/ The best way to create an image that appeals to you is to experiment. The image above shows the settings I used in this example, although as you'll discover the settings will be different for each image. Once you are happy with your image click 'OK'.


The example Droste settings shown above result in this image which I then cropped  a little and overlayed a few grunge textures just to add more character. This picture reminded of a Medieval manuscript image so one of the textures I added gave it the appearance of old creased paper. The final result of all this is the image at the top of the page.

There are a number of variables when creating Droste images and I have shown just one way of producing them. It may be that the image you used didn't suit this particular way of creating a Droste effect, and if this is the case you could try ticking the 'Map From Top' box when opening the Polar Coordinates window.

You could also try cutting a transparent hole in a section of your image to see what effect that has as well as playing with the 'StartingLevel', 'LevelFrequency' and the 'Strands' sliders in the Droste window. 

Another variable is to skip the polar coordinates step and just use the MathMap plugin - this works best when you create a transparent hole in part of the picture.

If you would like to see more of my Droste images you are very welcome to visit my gallery spaces at Timamoon Arts and the Avalon Art Centre, or you can view them on my Marketplace store, (if this link doesn't take you straight to the Droste images on the Marketplace, close the window and click on it again. There is a bug in the wires somewhere). I hope you enjoy creating your own Droste images and hopefully sharing them in Second Life.

Read More
Lusus

How to Upload A Blogger Template

How to upload a blogger template

As we all know there are numerous Second Life Residents who have a blog relating in some way to their SL experience, so if you are considering starting your own blog the first thing you'll need is a template that makes your blog stand out.

The kind of template or theme you choose for your blog will largely depend on the subject. For instance, if the blog is going to be mostly picture orientated then perhaps a theme aimed at photographers may be approproate. On the other hand, if your blog is going to have more of a magazine feel, then there are plenty of magazine or newspaper templates available.

You may already have noticed that Blogger has a series of themes for you to start off with, but in my opinion it is much better to upload one from a website that specialises in designing Blogger themes -  a quick Google search will bring up many places you can download templates from. These templates tend to look a lot more professional than the generic Blogger themes, and they are often designed for use on mobile devices so your blog can also be viewed on the go.

Once you find a template you like you'll need to download it onto your hard drive and unzip it. If you don't have software that can compress/uncompress files try 7-Zip , its free.

Uploading A Template

Once you have decided on a title for your blog and have covered all the preliminary steps in Blogger it is time to upload your selected template.

How to upload a blogger template

1/ Sign into your Blogger Dashboard then to the right of the blog name click on the down arrow (see area highlighted in red above), then from the drop down menu select Template.

How to upload a blogger template

2/  In the top right of the new page that opened there is a Backup / Restore button. Click on this.

3/ A small window will now open. Click on the browse button and navigate to the Blogger template on your hardrive and open it.

How to upload a blogger template: Backup / Restore window

4/ The Backup / Restore window will now look similar to the above with the name of the template to the right of the Browse button. Click on Upload.

Thats all there is to it - as soon as Blogger has finished uploading the template it will be live on your blog, and if you haven't done so already you'll be ready to start adding posts.

Quick Tip On Changing Templates

Once you see a template on your blog you may decide its not quite what you're looking for and you may decide to upload quite a few before you find the template thats right for your blog. If you do upload a number of templates it is much better to go back to a default blogger theme and delete as many widgets as possible inbetween uploads. 

The reason for this is that you will accrue far too many widgets on your blog and you will lose track of which widget belongs to which template. Also, uploading one template after another can sometimes affect how they look on your blog.

Read More
Lusus

How To Create A Neon Sign Using Inkscape

neon sign
This is a simple tutorial which will hopefully be a good introduction to anyone new to Inkscape, although it does assume some familiarity with the more common Inkscape tools. Although a neon sign can be made in other software such as Gimp, one of the advantages of using Inkscape is that you do not have to decide the final size of the image until you have completed what you are doing, as we will see.

Creating The Neon Sign

1/ Open Inkscape and resize it to fit your screen. Press '5' so that the page area fits the Inkscape window.

2/ Select the text tool to the left of the window (F8) and type the text for your neon sign.

How To Create A Neon Sign Using Inkscape

3/ From the Command Bar select the Font tool ( Shift >Ctrl >T) to choose the font for your sign and the font size. From the window that opens (see image above) select the font and font size you want to use.

The font selected for this tutorial is called Neon 80s that I downloaded from Fontspace, a website with a good selection of free fonts.

After you have decided on your font and font size click  Apply.

4/ Choose the colour for your font from the palette at the bottom of the Inkscape window. Then hit Ctrl>D to make a copy of the text object.

5/ The copy of the text object will be above the original, and we are going to use this copy to create the highlights of the neon sign. We do this by first changing the colour to white, then selecting Ctrl>Shift>( which will inset the text.

To get the highlight looking just right you may need to hit Ctrl>Shift>( a few times. Be careful however not do this too many times because the result will become unpredictable and you will need to restart this step.
How To Create A Neon Sign Using Inkscape
6/ Once you are happy with the highlight bring up the Stroke and Fill panel by hitting Shift>Ctrl>F. Now using the slider add a little blur to make the highlight more realistic, (see image above).

7/ The text of a neon sign appears to glow, so we will create this effect by adding another copy of the original text object and then, instead of using the Inset tool (Ctrl>Shift>( ), we will use the outset tool.

8/ To make a copy of the original text object make sure it is selected and then hit Ctrl>D. You may need to zoom in to make sure you have the right object selected.
How To Create A Neon Sign Using Inkscape
9/ Send the copy to the back of the other objects by hitting the Page Down key a few times. Now use the outset tool to expand the object by hitting Ctrl>Shift>) a few times, until you are happy with the appearance of the object, (see image above).

10/ Hit Shift>Ctrl>F  to bring up the Fill and Stroke panel again, and use the blur slider to make the object seem like the glow of the text layer. In the example here a blur of around 5 was used.

11/ All the neon sign needs now is a background, so select the box tool from the Toolbox to the left of the Inkscape window (or hit F4), and drag your cursor over the neon text until you have a size that suits you.

Give it a black fill, then send it to the back of the objects by hitting the Page Down key a few times. The neon sign is now complete, and we just need to export it as a bitmap.

Exporting the Neon Sign

How To Create A Neon Sign Using Inkscape

To export the neon sign,  select File>Export (or Shift>Ctrl>E) and in the window that opens you will see you can choose the size of the image to be exported, see image above). Once you have chosen the size for your image hit the Export button.

neon sign in Second Life

If your sign is to be used in Second Life, all you need to do now  is upload the image and add it to a prim. The above image shows the sign created here placed in my gallery close to the cinema, which I hope shows how effective Inkscape can be in creating neon signs, particularly when used in Second Life.
Read More